|
This page is an eclectic collection of some past inventions and imaginative play outcomes. Creatively, these were the least popular, but the most fun I had. The popular ones ended up in some of the books shown below. This is where I point out that my most joyous "writing while running" experiences have been with Dr. Michael Gass. |
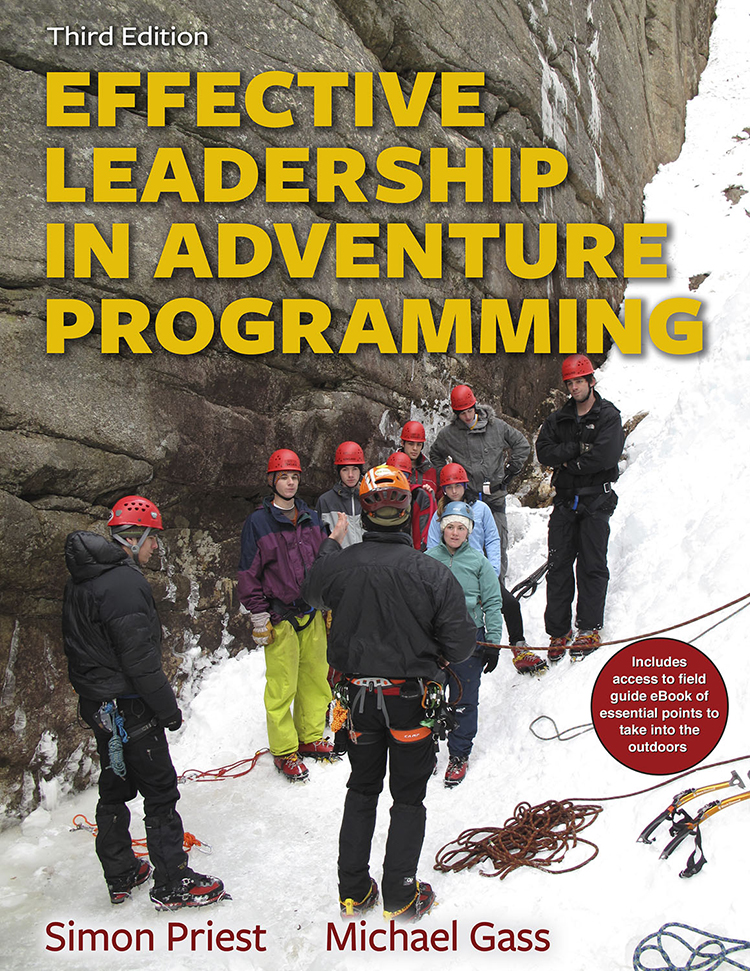
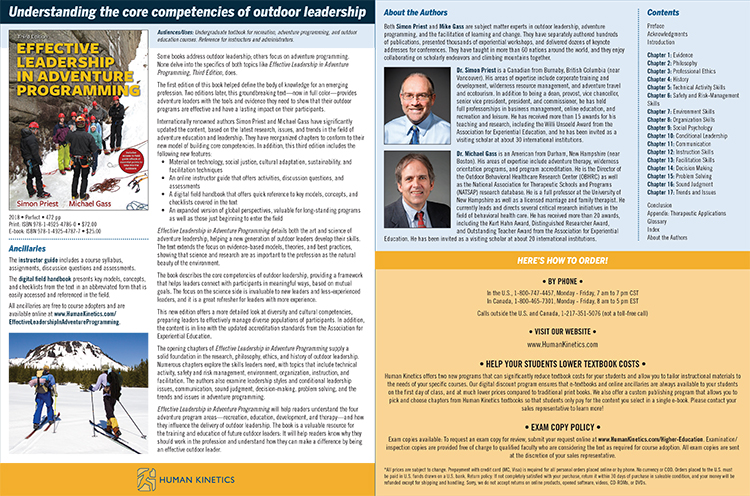
EFFECTIVE LEADERSHIP IN ADVENTURE PROGRAMMING (THIRD EDITION): I am pleased to announce the 2017 publication of our third edition of this best selling textbook used by the majority of universities with outdoor adventure programs all around the globe. The latest copy from Human Kinetics comes with a digital field handbook and instructor's guide (edited by Brent Bell with contributed lesson plans from experts in their fields). My heartfelt thanks to Mike Gass for suggesting we do a new version after twenty years as number one and to following through on his writing load so as to keep me going. Although this is no longer my area of expertise, I have fond memories of the profession. |
|
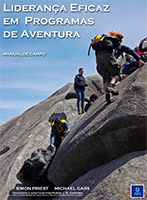
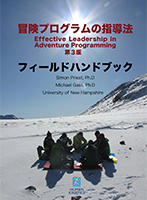
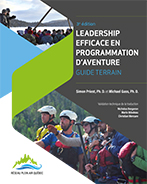
FREE DOWNLOADS OF TRANSLATED STUDENTS' DIGITAL FIELD GUIDES: Additional languages coming soon.
|
|
|
|
|
|
|
|
|
|
|
|
|
|
|
|
|
SPANISH
|
MANDARIN
|
HINDI
|
|
|
|
|
|
|
GERMAN |
NORWEGIAN |
|
INDONESIAN/MALAY |
|
|
BOOKS & ARTICLES: Here are a few publications where I hold the copyright (or share it with my co-authors). Clicking on a book does nothing at the present time, but I hope in the future to have Common Content licenses in effect for some of these texts. Meanwhile, email me and I'll see if I have a copy for sale at cost to those who want one. Clicking on an article's title opens a new page with a freebie that you can use for educational purposes, but you need Acrobat Reader. To keep its length reasonable, I've reduced this list to the top 20 articles most requested by graduate students. |

- Priest, S. (2001). Program Evaluation Primer. Journal of Experiential Education, 24(1): 34-40.
- Gordon, S., Harcourt-Smith, K., Hay, K., & Priest, S. (1996). Case study of Blue Watch on STS Leeuwin. Journal of Adventure Education and Outdoor Leadership, 13(1), 4-8.
- Priest, S. (1993). A new model for risk taking. Journal of Experiential Education, 16(1), 50-53.
- Priest, S. & Bunting, C. J. (1993). Changes in Perceptions of Risk and Competence for whitewater canoeing. Journal of Applied Recreation Research, 18(4), 265-280.
- Priest, S. & Carpenter, G. (1993). Changes in Perceived Risk and Perceived Competence for Adventurous Leisure. Journal of Applied Recreation Research, 18(1), 51-71.
- Priest, S. (1992). Factor Exploration and Confirmation for the Dimensions of an Adventure Experience. Journal of Leisure Research, 24(2), 127-139.
- Friedrich, M., Hatton, C., Naismith, M., Wensink, J. & Priest, S. (1992). Functions of Wilderness Privacy in Canadian Outdoor Recreation. Journal of Applied Recreation Research, 17(3), 234-254.
- Priest, S. & Bugg, R. (1991). Functions of Privacy in Australian Wilderness Environments. Leisure Sciences, 13(3), 247-255.
- Carpenter, G. & Priest, S. (1989). The Adventure Experience Paradigm and Non-outdoor Leisure Pursuits. Leisure Studies, 8(1), 65-75.
- Priest, S. (1988). The Ladder of Environmental Learning. Journal of Adventure Education and Outdoor Leadership, 5(2), 23-25.
- Priest, S. (1986). Redefining Outdoor Education: A matter of many relationships. Journal of Environmental Education, 17(3), 13-15.
DOCTORAL DISSERTATION
|


- Gass, M.A. & Priest, S. (2006). The Effectiveness of Metaphoric Facilitation Styles in Corporate Adventure Training (CAT) Programs. Journal of Experiential Education, 29(1): 78-94.
- Priest, S., Gass, M., & Fitzpatrick, K. (1999). Training corporate managers to facilitate: The next generation of facilitating experiential methodologies? Journal of Experiential Education, 22(1): 50-53.
- Priest, S. & Gass, M. A. (1997). An examination of problem-solving versus solution-focused facilitation styles in a corporate setting. Journal of Experiential Education, 20(1), 34-39.
- Priest, S. & Montelpare, W. (1995). Prediction of heart rates on a ropes course from simple physical measures. Journal of Experiential Education, 18(1), 25-29.
- Priest, S. & Lesperance, M. A. (1994). Time Series Trend Analysis in corporate team development. Journal of Experiential Education, 17(1), 34-39.
- Priest, S., Attarian, A. & Schubert, S. (1993). Conducting Research in Experience-based Training and Development Programs: Pass keys to locked doors. Journal of Experiential Education, 16(2), 11-20.
- Bronson, J., Gibson, S., Kishar, R. & Priest, S. (1992). Evaluation of Team Development in a Corporate Adventure Training Program. Journal of Experiential Education, 15(2), 50-53.
- Gass, M., Goldman, G. & Priest, S. (1992). Constructing Effective Corporate Adventure Training Programs. Journal of Experiential Education, 15(1), 35-42.
- CATInate Abstracts (summaries of ETD studies 1 through 30)
|
|
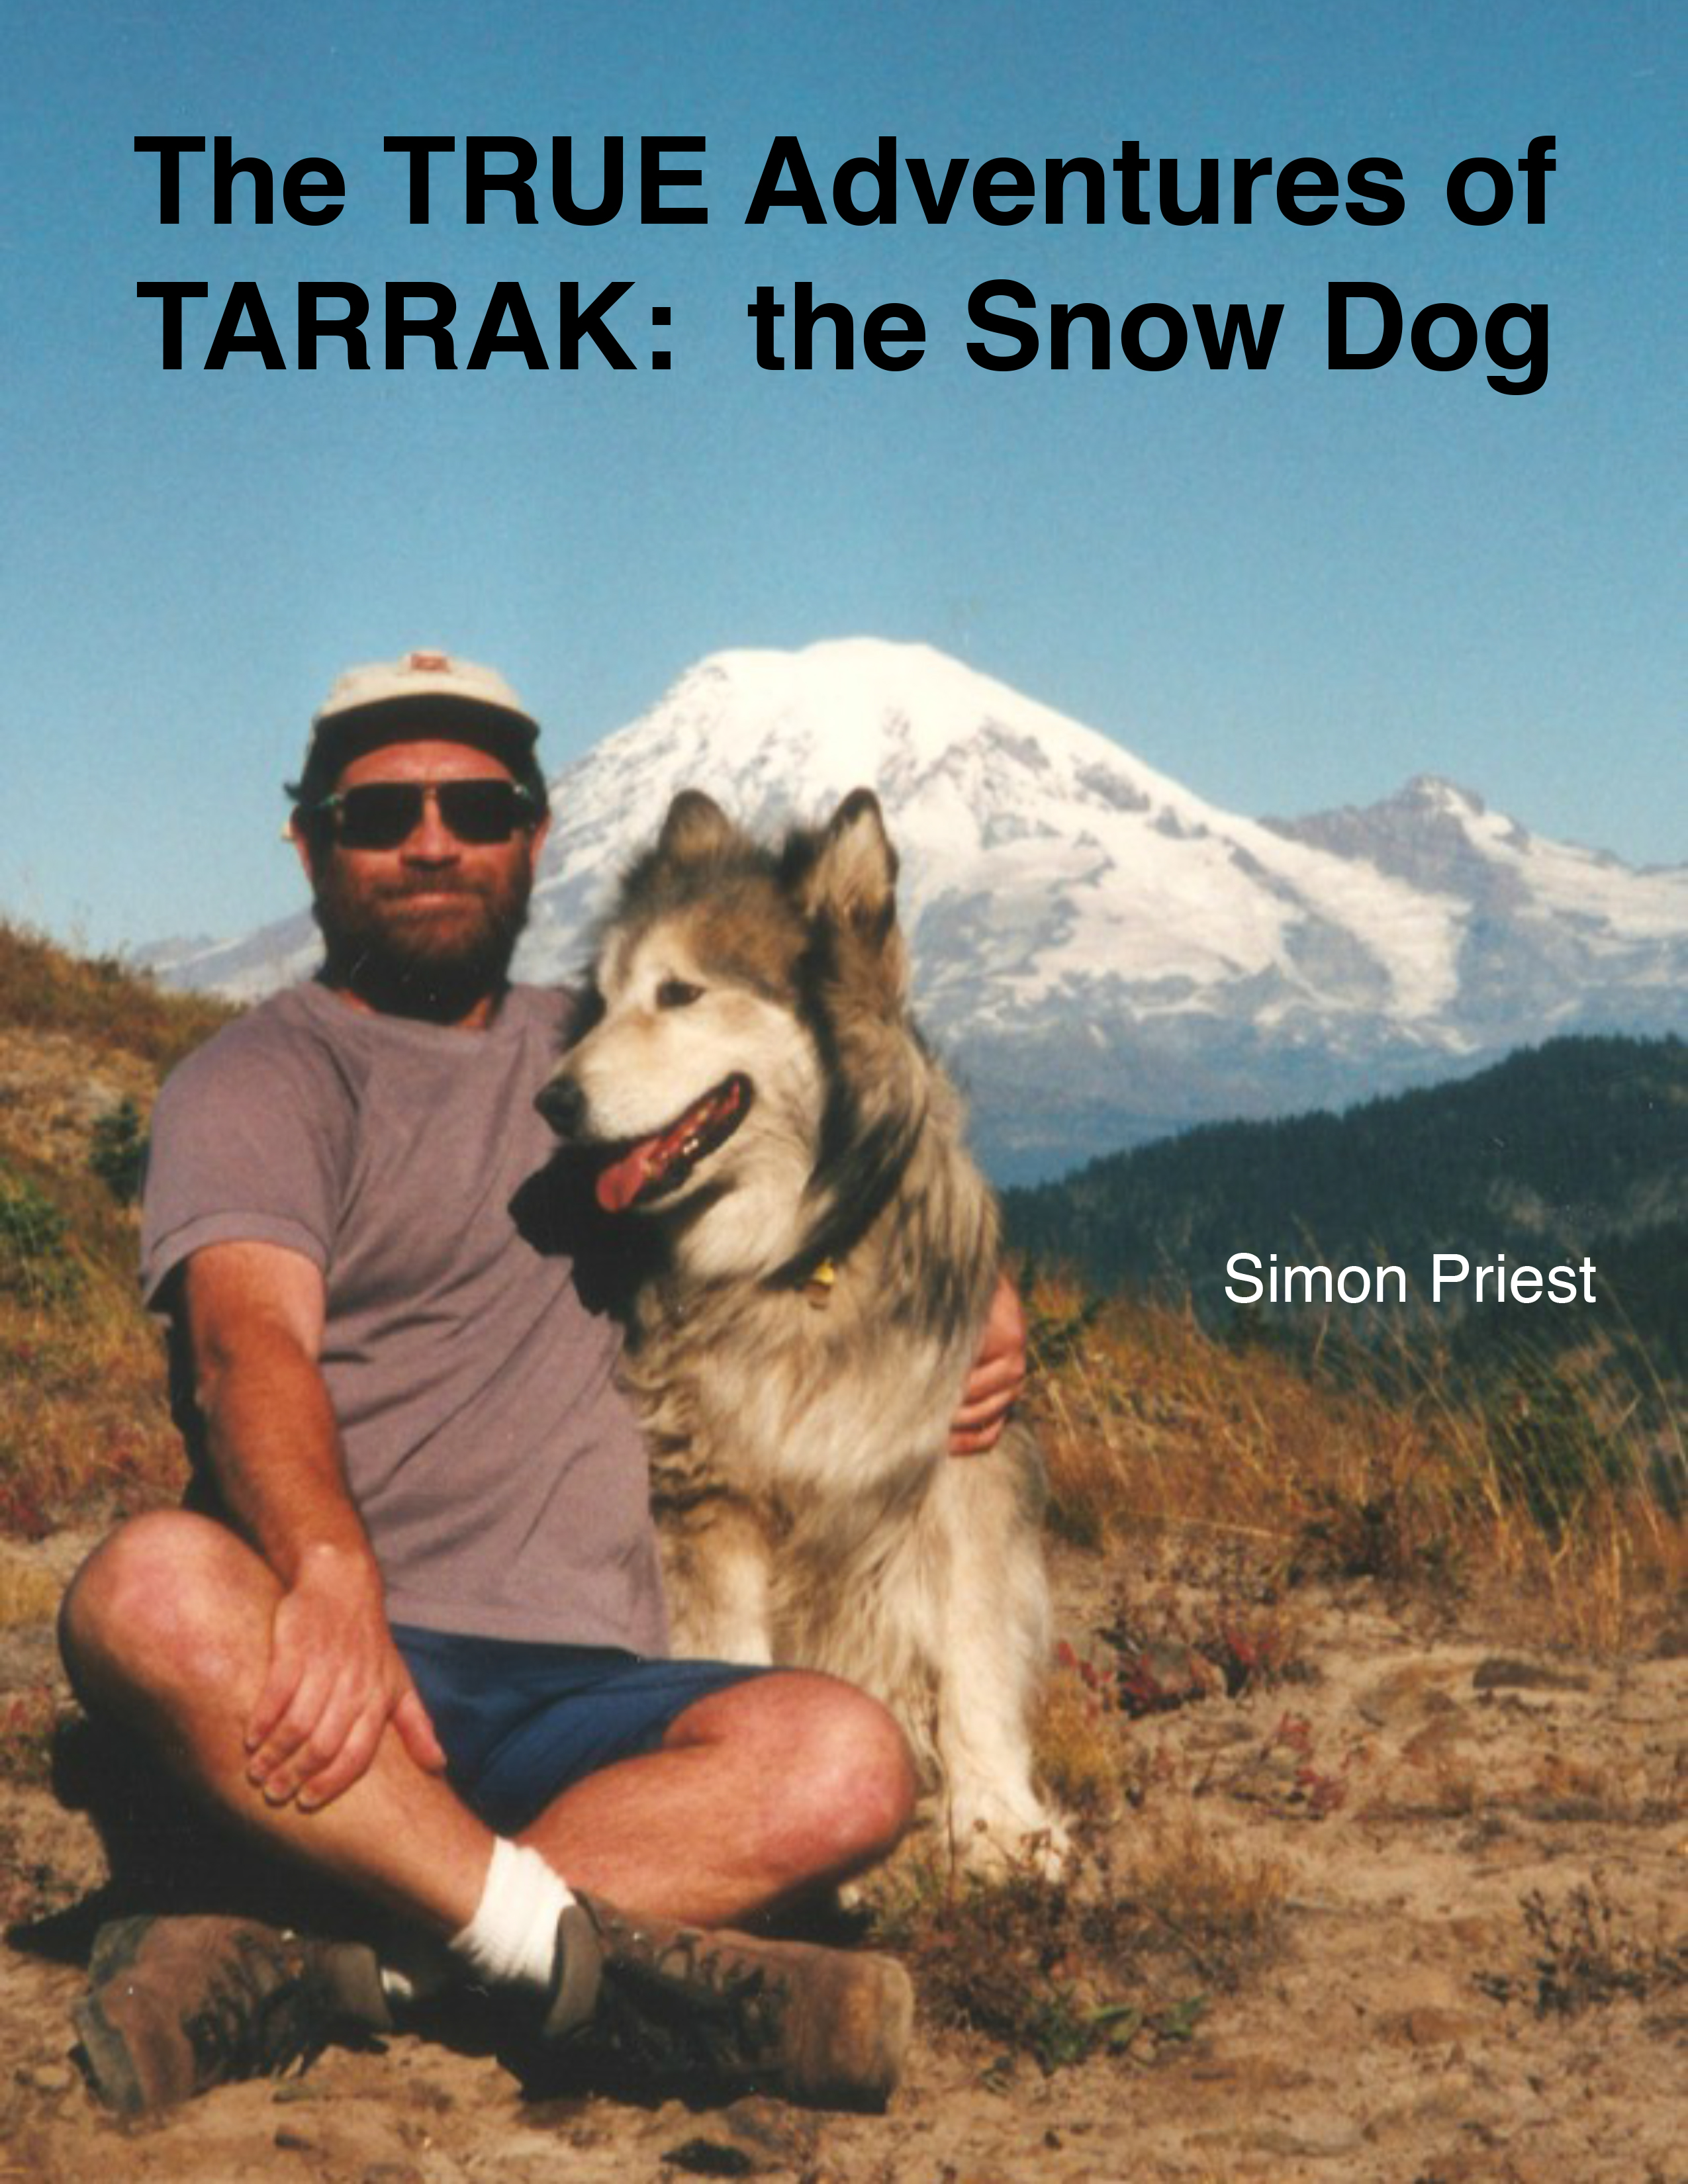
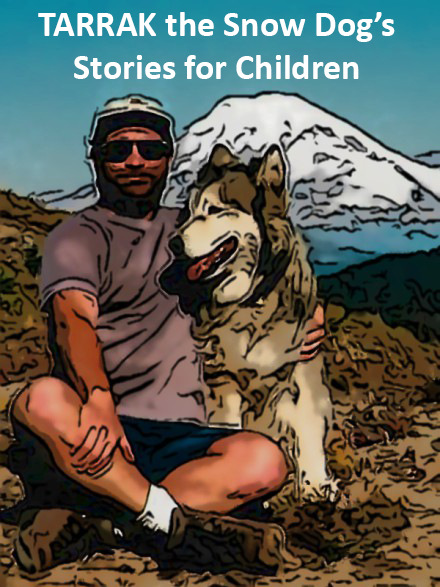
TARRAK-SNOW DOG: Here is book I wrote for adults in 2018. A children's version with illustrations is coming in the near future. Click on the images to download the books (as PDF files), enjoy, and share with others. |
|
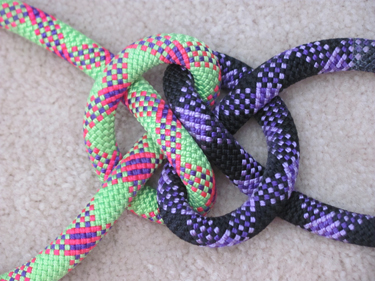
KNOTS & ANCHORS: As a mathematics fanatic as a kid, I had a penchant for puzzles and especially topology. As a climber, I liked to tie different knots. One day in 1975, while playing around with some rope, I created a variation of the "hunter's bend" (AKA rigger's bend). Once I had this figured out, I invented what climbing friends came to call the "Priest's Cross" and used it as an adjustable anchor attachment. Since half of any load on the rope passed directly through the knot unimpeded, it was strong and easily untied and/or adjusted after heavy loading from falls while climbing. |
|
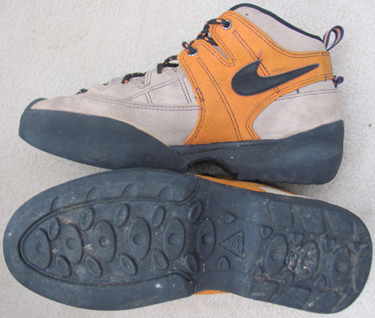
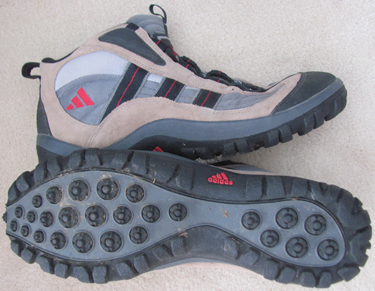
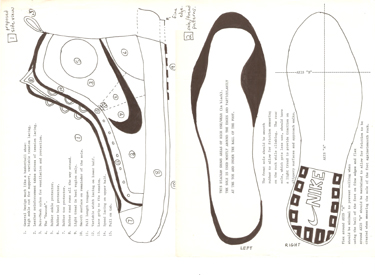
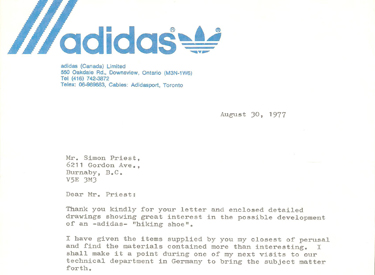
FOOTWEAR: In 1970's, I was doing a lot of backpacking and climbing with friends in my high school and later university outdoor clubs. I ran and played basketball at the time and was constantly wearing out my expensive sneakers on Vancouver trails or British Columbia cliff faces rather than on tracks or ball courts. I wrote to Nike with my ideas for developing climbing shoes (1976) and to Adidas about the same for hiking boots (1977). They were kind enough to prepare prototypes (see pics below) based on the diagrams I sent them, but neither design saw much popularity. Limited sales of both meant that I didn't enjoy anything in the way of royalties, but I got free footwear for a few years! |
|
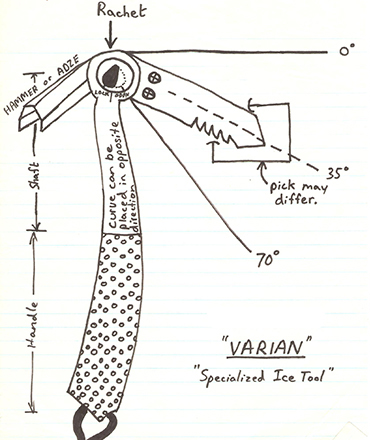
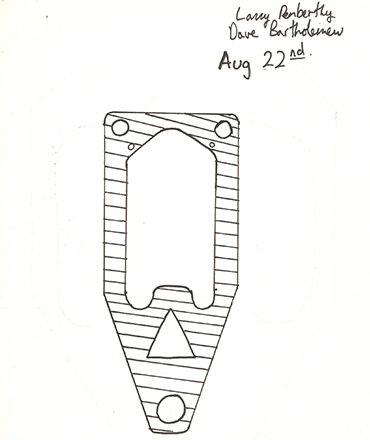
CLIMBING GEAR: In the late 1970's and early 1980's, before going off to graduate school, I experimented with these two designs: the Varian (a rachet-angled and adjustable ice climbing tool begun in 1978) and the Solo Plate (a self-belay device for climbing alone started in 1979). Larry Penberthy, Chief Engineer for Mountain Safety Research, worked with me to manufacture and stress test some samples. I was a great admirer of his work and of MSR's stoves, helmets, and ice axes, so our brief time together in Seattle is a fond memory that I will cherish. Simultaneous trends toward exchangeable pick pieces for ice tools and solo climbing techniques without belay managed to quickly make my ideas obsolete! |
|
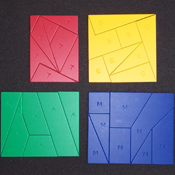
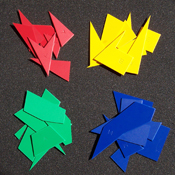
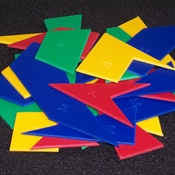
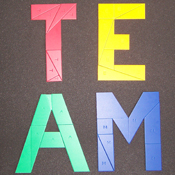
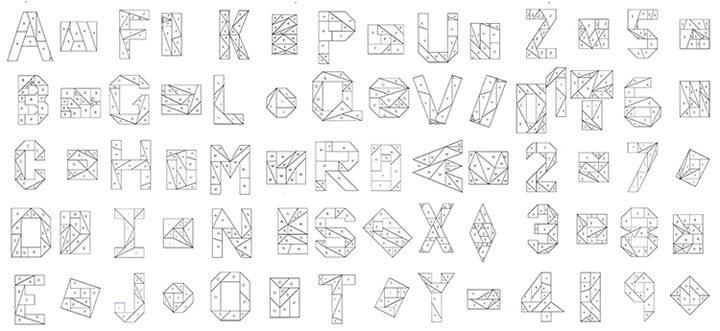
THE T.E.A.M. PUZZLE: When I was doing a great deal of team-building facilitation in the 1980's and 1990's, I needed to invent different puzzles to challenge the groups. My good friend, Karl Rohnke, had written a couple of dozen books on puzzles, games, and initiatives in this field. He helped me to refine the 1982 TEAM puzzle you see below based on the ancient Chinese Tangrams. Over time, I constructed more than 40 puzzles, covering the digits 0 through 9, all letters of the alphabet, and some punctuation marks. The TEAM puzzle was a best seller for Grip-it, a now defunct company that produced them until the early 2000's, but the design also made it into some of the books that Karl and I wrote during that time period. |
|
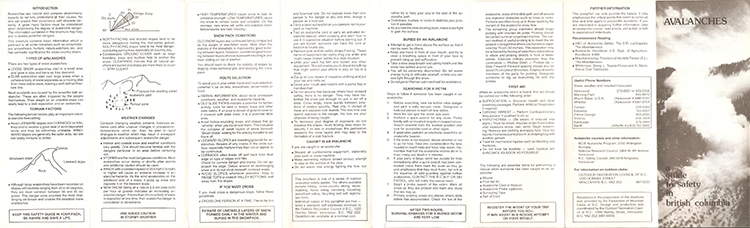
AVALANCHE SAFETY: In the late 1970's, we experienced some unfortunate avalanche deaths in British Columbia. I was the Safety Chairman and Executive Director of the Federation of Mountain Clubs for BC at the time and was asked to prepare a safety brochure for the Outdoor Recreation Council. I presented this outcome at an international geotechnology conference held in Vancouver in 1980. I got up infront of 500 scientists and talked for five minutes, handing everyone a copy. They were gracious. At 21, this was my very first presentation of thousands to follow, but I can recall how afraid I was to be speaking in public for the first time! The brochure was replicated by avalanche equipment providers, like LifeLink, who gave a free copy to anyone who purchased a backcountry snow shovel, set of probe poles, or a tranceiver/beacon in the 1980's. |
|
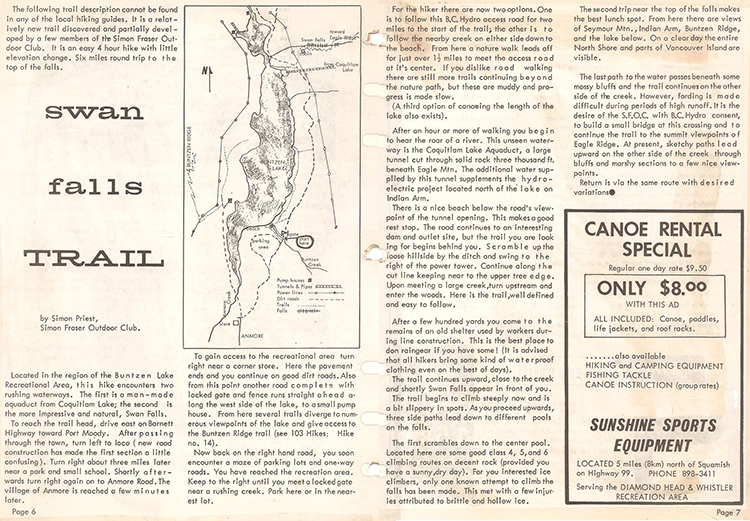
SWAN FALLS TRAIL: During my first year at university, Gordon Swan, myself, and other Simon Fraser University Outdoor Club members volunteered our time to build trails around Buntzen Lake, north east of Vancouver, for BC Hydro. We built a trail to the base of a large waterfall that I named Swan Falls for Gordon's efforts to coordinate the volunteers. I wrote this report for Whisky Jack Outdoor Magazine in 1976 at the age of 18! It was my very first publication of hundreds to follow. On returning to the area, I was recently struck by the changes I saw. The waterfall name had taken hold and Swan Falls and Buntzen Lake had become popular hiking destinations. An extensive trail system now surrounded the lake, and the trail we built continued to the top of the mountain, through the meadows, and then descended the ridge back down to three very enlarged parking lots. |
|
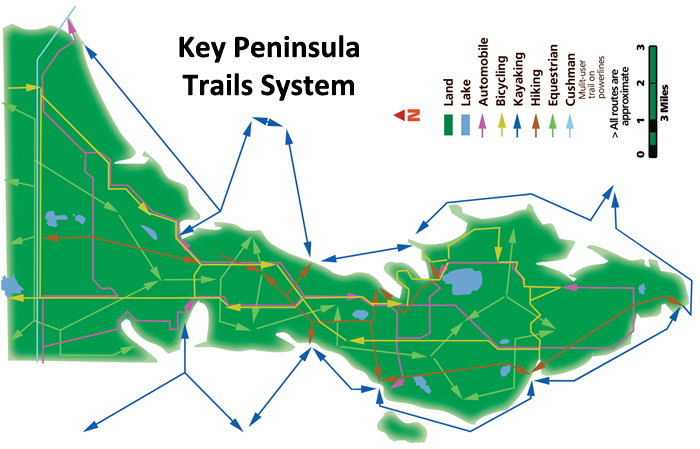
KEY PENINSULA TRAILS SYSTEM: I had a house on the Key Peninsula in the middle of Puget Sound for about 20 years. I spent some great summers walking on the trails and beaches. I sold the house on the day I created this ePortfolio, so I thought it fitting to include the trails system that Caril Ridley and I worked on through various "Key Pen" groups. The peninsula was pretty much like an island with only one main road and one back road onto it. Surrounded by water on all but the north side, it was a veritable wilderness of forests and lakes. We designed five trails in an interconnected system. The kayaking trail circumnavigated the beaches, while the automobile trail drove around to historical sites. We produced community books on these two and a television show to highlight the region. The hiking trail went from head to toe linking various parks likes pearls strung on a necklace. The bicycling trail traced a figure 8 on roads and paths. Books for these two were in development, but we never had enough time to finish the projects. The equestrian trail connected horse farms along roads or trails, while a multi-user trail crossed the top of the peninsula linking it to trails in adjoining counties and into the city of Gig Harbor. |
|
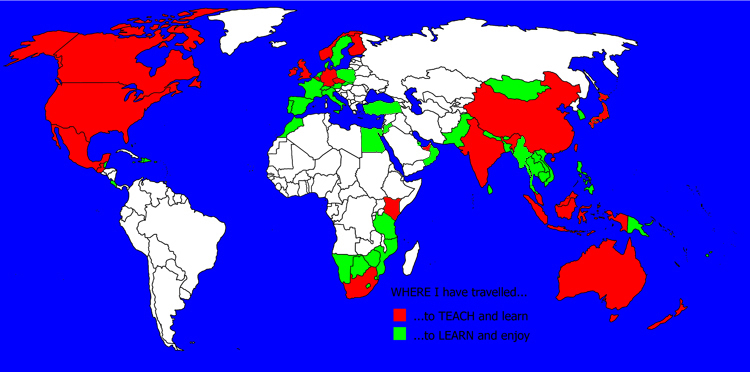
INTERNATIONAL TRAVEL: I've traveled to more than one hundred countries to learn about their cultures and histories. I have been invited to teach, present, and facilitate in about half of those. As a guest scholar from Canada, my Visiting Fellowships have included working at about two dozen institutions in: the USA, Australia, Germany, China, England, New Zealand, the Czech Republic, Canada, South Africa, etc. Nevertheless, I remain eager to visit the rest of the nations in white on this map, with the provision that my air travel includes a carbon emission offset. |
|
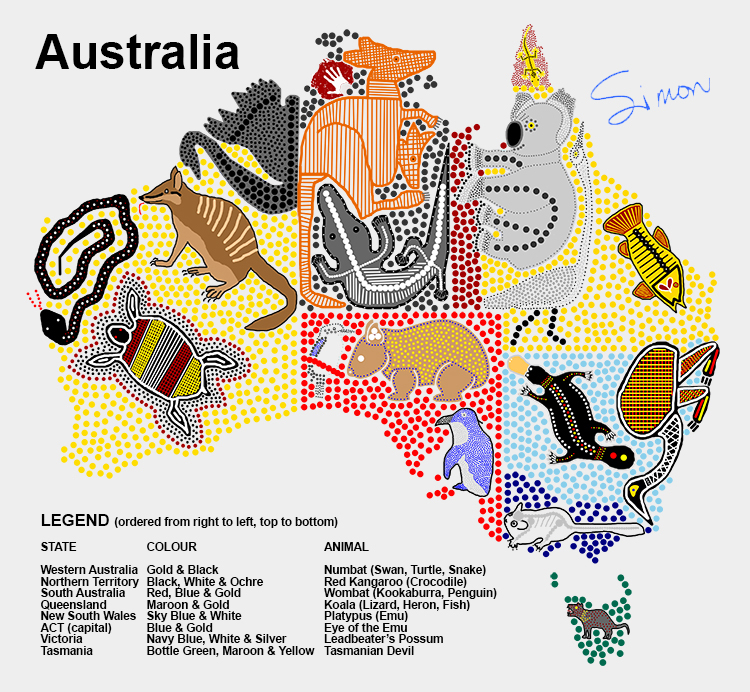
AUSTRALIAN ART: I am sensitive to the misappropriation of aboriginal cultural content. During my 26 trips to Australia, including seven visits as a distinguished scholar, I have had the opportunity to spend blocks of time with several generalized Koori tribes in the southeastern bush and Djabugay peoples in the northeastern rain forest. During those living experiences, I learned and practiced various forms of art: rock engraving, bark painting, and hand printing. Although I have their permission to produce my own artwork, I have only created this single expression of their nation using official state animals and colours. Anything more would seem inappropriate. Here is a description of the contents in this low resolution file.
- Western Australia: The Numbat (banded anteater) is the state animal, with a Black Swan (common to the Perth Estuary), a snake (seven of the ten most deadly in the world) and a turtle (common throughout the land).
- Northern Territory: The Red Kangaroo is the state animal (and defacto national animal), with a "joey" or baby on board, a crocodile (quite common in the Kakadu and Katherine regions) and a hand print (made from spitting ground ochre around one's own hand to signify having been there).
- South Australia: The Wombat (much like a ground dwelling koala) is the state animal, with a Kookaburra (call sounds like a laugh) and penguin (several Antarctic species found along the souther coastline).
- Queensland: The Koala (not a bear) is the state animal, with White Faced Heron (common on the coast), a fish (from the Great Barrier Reef), and a tiny lizard (many species found everywhere).
- New South Wales: The platypus (common to rivers in the bushland) is the state animal and an Emu (on the national coat of arms along with the Red Kangaroo).
- Australian Capital Territory: The ACT was too small a space to place an animal, so the Emu was positions so the ACT could be its eye.
- Victoria: The tiny Leadbeater's Possum (not to be confused with an Opossum) is the state animal.
- Tasmania: The Tasmanian Devil (isolated to this island) is the state animal.
|
|
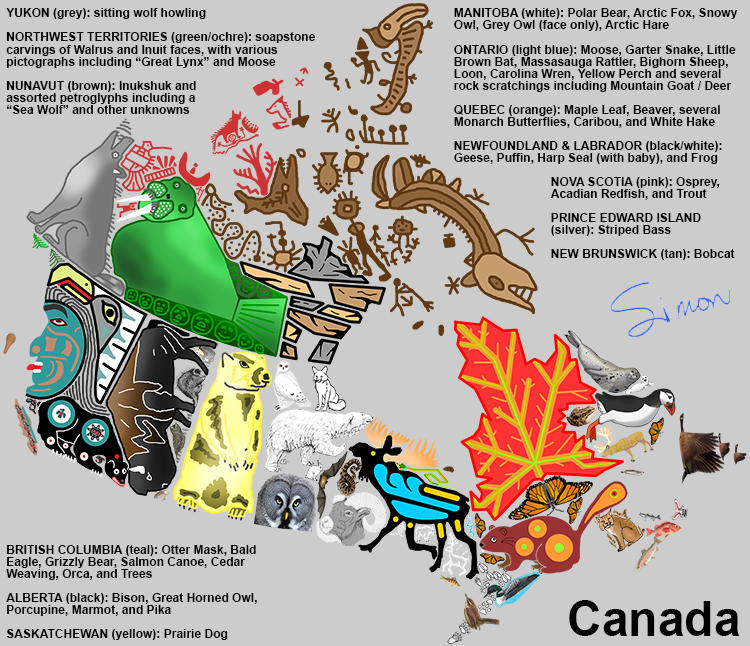
CANADIAN ART: I am sensitive to the misappropriation of indigenous cultural content. Having spent half my life in Canada, I have had the opportunity to live within several first nation groups ranging from the generalized Inuit in the arctic, through Nootka and Kwakiutl on the west coast, to Mohawk and Algonquin in the eastern woodlands. During those valuable experiences, I learned and practiced various forms of art: soapstone and bone carving, wooden mask and canoe carving, and totem pole and long house carving, construction and painting. Although I have their permission to produce my own artwork, I have only created this single expression of our country using official provincial animals and random colours. Anything more would seem inappropriate. Here is a description of the contents in this low resolution file.
- Yukon (grey): We begin with a howling Grey Wolf (my favourite animal, see Tarrak: the snow dog) in sitting position.
- Northwest Territories (green/ochre): The main attraction here is a Walrus carved in soapstone (talc-schist) and surrounded by stylized Inuit faces. The pictographs (rock paintings in ochre) comprise those I recall from photos of my travels from across Canada and include a hummingbird, a dragonfly, a single person kayak, branched antlers from the Cariboo, the "Great Lynx" (a mythical creature), snakes, group canoe, Horse, Moose, and other symbols.
- Nunavut (new territory established in 1999, brown): The main attraction here is the Inukshuk (navigational symbol), surrounded by drawings of petroglyphs (rock carvings) taken from rubbings done near Peterborough, Ontario (1960s) and Nanaimo, BC (1970s). These form the main Arctic Islands and include an Orca, Flounder, "Dancing Man," "Solar Man," "Nanabozho" (the trickster), snake, turtle, several tools and/or active stick figures, and two mythical creatures (one is unknown, but famous, while the other is a "Sea Wolf").
- British Columbia (teal): The Otter Mask (half circle) looks the same in profile as it does head on and fits perfectly into the Pacific coastline. A Bald Eagle head fills the north eastern corner of the province and a Grizzly Bear (painted unceremoniously) fills the southern portion with a small Orca nearby. Vancouver Island is a Salmon Canoe with the silhouette of a Coast Salish vessel carved from Cedar and the Haida Gwaii (previously called the queen charlotte islands) are a cedar weaving.
- Alberta (black): A Bison grazing on the prairie plains with a Marmot, Porcupine, Great Horned Owl, and Pika at ground level.
- Saskatchewan (yellow): A Prairie Dog (there is more to SK than this, but it fit perfectly on its own).
- Manitoba (white): The Polar Bear forms the center of this group with Snowy Owl and Arctic Fox above and with Grey Owl and Arctic Hare below.
- Ontario (light blue): A Moose at the centre is bordered by a Garter Snake on its back, while in front is a Massasauga Rattlesnake, Little Brown Bat, and Bighorn Sheep. To the far south lies a Loon, Carolina Wren, and Yellow Perch. In between are several animal tracks (bear, cougar, raccoon, coyote, and deer) and a few rock etchings of a mountain goat and deer or elk.
- Quebec (orange): A Maple Leaf (national emblem) has been fashioned to fit the shape of the upper province and the Beaver's tail fits into the Gaspe Penninsula. The antlers of a Caribou fit into the complex jigsaw border with Labrador and a White Hake occupies the Island of Anticosti. Several Monarch Butterflies (summer migration) fills the remaining spaces.
- Newfoundland and Labrador (black/white): Three Canada Geese make up the island, while the Atlantic coast is formed from a Puffin, Leopard Frog, and Harp Seals (adult with young pup).
- Nova Scotia (pink): An Aosprey forms the shape of Cape breton island, while the mainland is formed from two fish: Rainbow Trout and Acadian Redfish.
- Prince Edward Island (silver): a curved Stiped Bass forms the shape of this island.
- New Brunswick (tan): a sitting Bobcat forms the shape of this mainland maritime province.
|
|
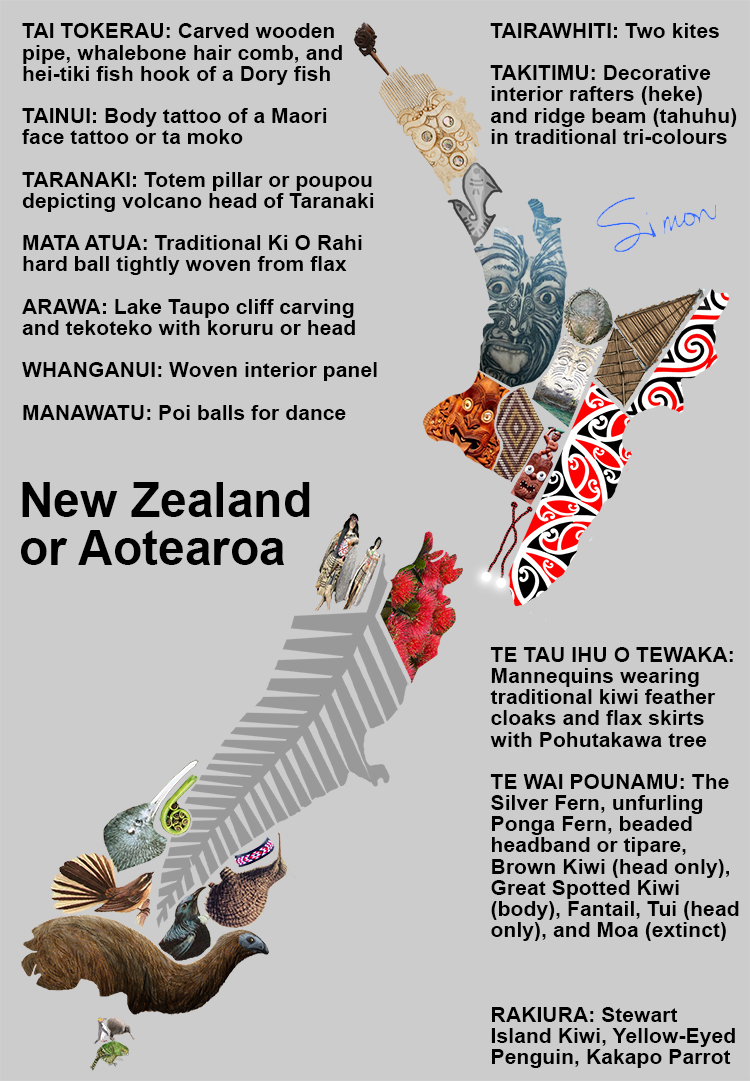
AOTEAROAN ART: I am sensitive to the misappropriation of Polynesian cultural content. During my 13 trips to New Zealand (also Hawaii and other Pacific islands), including two visits as a distinguished scholar, I have had the repeated opportunity to spend time living and travelling with the Ngati Purou Maori of the eastern cape region. During these experiences, I learned and practiced various forms of art: wood, greenstone, and bone carving, paua shell inlay, flax weaving, and generalized painting for the repair of a Marae (spiritual community). Although I have their permission to produce my own artwork, I have only created this single expression of their islands using national animals and colours. Anything more would seem inappropriate. Here is a description of the contents in this low resolution file.
- Overall: Historically, Pakeha (European) scholars suggest the Maori (Polynesians) arrived in Aotearoa/New Zealand around 1000AD by canoe migration eastward over thousands of years from Taiwan and the Philippines via New Guinea, Fiji, Samoa, Tahiti, and the Cook Islands. Legendarily, Maori express that they arrived by canoe (waka) expeditions that originated in Hawaiki (not to be confused with Hawaii), that is located in the Polynesian Islands somewhere in the mid-Pacific Ocean. Geograhically, Aotearoa/New Zealand is split into two major islands (North or Te Ika a Maui meaning "fish of the demigod Maui" and South or Te Wai Pounamu meaning "the waters of greenstone" or jade) and one minor island (Stewart). The tangata whenua (people of the land) are self-divided into waka (territorial "canoes" arranged by migration arrival region) composed of multiple iwi (ancestral "tribes" of several extended families or whanau). Traditional Maori live near a marae (community place) with a central wharenui (meeting house). Metaphorically, the wharenui represents the body of an ancestor with parts of the house representing parts of the body: head, arms, hands (on the front outside), heart, spine, and ribs (on the inside). The wharenui is an artistic expression of Maoritanga or tribal culture and most communal art is conducted on the marae. Artistically, since patterns are distinct to the whakapapa (genealogy) of each waka, iwi, or whanau, I have chosen to represent these according to their geographic locations within the artwork. Maori are concentrated mostly on the North Island.
- North Island: Several waka include Tai Tokerau (north of Auckland), Tainui (south of Auckland), Taranaki (surrounding the western volcano-Egmont/Taranaki), Arawa (in the central region and geothermal zone), Whanganui with Manawatu (south of the geothermal), Mata Atua (north of the geothermal), and Tairawhiti (north of the east cape) with Takitimu (south of the cape and most of the eastern coast). North of Auckland are three carvings of a wooden pipe (smoking introduced by Pakeha/Europeans), a whalebone hair comb, and a stylized fish hook (hei-tiki or pendant) patterned after a Dory (common fish in the Tasman Sea). Continuing down the west coast are two faces; one is a tattoo or tamoko (Maori are a proudly tattooed population), while the other is a carved poupou (totem pillar inside a meeting house) with a peaked conical forehead representing the local volcano. Both faces show protruting tongues and bulging eyes meant to scare off evil spirits or enemies at the end of a haka (war dance and chant) which also includes vibrating hands, slapping thighs, thumping chests, and stomping feet. The central strip contains five objects; the Ki O Rahi ball is used in a traditional sport (like a combination of netball and rugby), a cliff carving over the waters of Lake Taupo, a tekoteko (ancestral idol) with koruru (head of the meeting house), an interior wharenui (meeting house) panel woven from flax, and Poi balls swung in traditional song and dance displays. On the eastern cape and coast, woven kites were flown for play and the heke and tahuhu (rafters and ridge beam) show the repeating tri-colour patterns used inside a wharenui.
- South Island: The two waka are Te Tau Ihu O Tewaka (upper 10%) and Te Waipounamu (lower 90%). The upper portion of the island contains a couple wearing Kiwi feather cloaks with flax skirts and a Pohutakawa Tree (blossoms bright red, briefly during christmas). Less populated and less developed than its northern counterpart, this southern island is well known for its abundant bird life. The frond of a Silver Fern (national emblem) runs south from here to a koru or unfurling gren fiddlehead of a Ponga Fern, a beaded headband (in traditional tri-colours), and a pair of famous flightless and nocturnal Kiwis (Brown. head only; Great Spotted, body). Two other remarkable and common birds are the Fantail (spreads it tail like a fan as it flits about catching flies), and the Tui (lyrical sounding song bird). At the end of the island is one of several extinct species of flightless Moa (Ostrich-sized and up to twice as large, these were eaten to annihilation by the early Maori, within a century of their initial arrival; the Maori fittingly called themselves the "bird hunters").
- Stewart Island: One tribal concentration exists and is Rakiura ("glowing skies" in reference to the Southern Lights or Aurora Australis). This wild island, with no predators and only about 400 human inhabitants, is home to abundant and rare bird life, including the Steward Island Kiwi, Yellow-Eyed Penguin, and Kakapo Parrot as illustrated here.
|
|
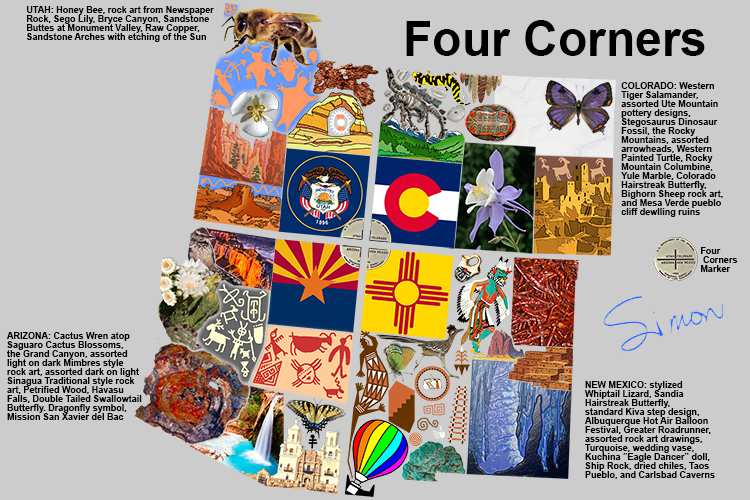
FOUR CORNERS ART: I am sensitive to the misappropriation of Native American and Puebloan cultural content. During my many years of living in the USA, the Desert Southwest was my favourite and most frequent vacation destination. I focused on the Four Corners region where the four states (Arizona, Colorado, New Mexico and Utah) met and shared common corners. I went for the high altitude hiking and climbing, but also to enjoy the cultural experiences. I lived and worked on several pueblos for various reasons: from rebuilding an old church, through restoring several traditional houses and kivas (underground meeting places), to participating in feasts, dances, and other ceremonies. I practiced some kiva symbols and artwork for resoration purposes, but permission to produce my own was NOT given, because some art is considered sacred. Therefore, this project does not share much in the way of original art as it is more collage than culture. Here is a description of the contents in this low resolution file.
- Four Corners: In reaility, at the point where the four states come together, a geological survey marker is set and surrounded by a plaza with several arts and crafts stalls. In this collage, the marker's image is quartered and set within the boundaries of each corrresponding state, along with part of each state's flag. This forms a central square that grounds the entire work. In each state, the items of interest are arranged into columns with groups of items in each column; we read from up to down and from left to right.
- Utah: This is the "beehive state" and so the Honey Bee is their state insect. Below this bee, are several pieces of rock art common to the Newspaper Rock area (high density of art; like reading the paper in some places). The state flower is the Sego Lily and some of the well known natural attractions include Bryce Canyon and Monument Valley (shared with Arizona). Copper is the state rock/mineral and many sandstone arches abound.
- Arizona: The state bird, a Cactus Wren, sits on top of the state catus/flower, a Saguaro in blossom (birds drink nectar from flowers). Beside this bird, is sunset at the Grand Canyon and below this are several examples of rock art in the Mimbres style (usually scratched light on dark). In the bottom corner is a sample of Petrified Wood, the state rock/mineral. The second set of rock art examples are in Sinagua style (drawn dark on light). below these are Havasu Falls, the Double-tailed Swallowtail Butterfly (state insect), and the Spanish Mission, San Xavier del Bac, outside Tucson.
- Colorado: The Western Tiger Salamander is the state amphibian, surrounded by some local black on white pottery samples, but beside this is the dinosaur fossil of a Stegosaurus towering over a scene of the snow capped Rocky Mountains. Next are a collection of arrowheads and the undershell of a Western Pained Turtle (the state reptile). The state flower is the Rocky Mountain Columbine and the state insect is the Colorado Hairstreak butterfly. It sits on Yule Marble, the highest quality white marble used to make many of the capital monuments in Washington, DC. Below this, are some rock art examples of Bighorn Sheep and the iconic scene of Mesa Verde, a cliff dwelling ruin of ancient puebloan culture.
- New Mexico: A Whiptail Lizard (the state reptile) is presented in stylized form, along with the Sandia Hairstreak butterfly (the state insect). Below these are representations of the classic steps found imprinted on the walls of most kivas (underground meeting places) and a hot air balloon from the Albuqueque Festival. Under the Greater Roadrunner (state bird) is a collection of rock art showing corn/maize, a kiva, symbols for migration, and a ladder used to access upper levels of buildings in a pueblo. At the bottom of this column is a sample of Turquoise (used in jewelry making). At the top of the next column, is the wedding vase (pottery with two spouts, one for each spouse) and a Kachina doll (ceremonial idol of the Eagle Dancer in this instance). Red Chiles are dried and used in cultural cooking, with profiles of Ship Rock and Taos Pueblo above the last attraction -- the caves at Carlsbad Caverns.
|
|
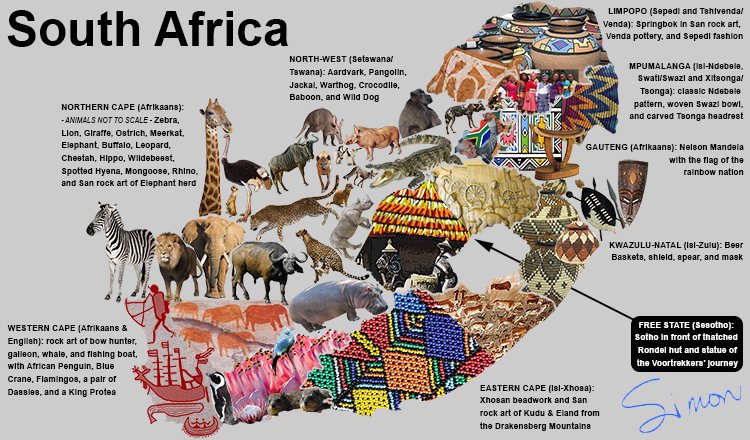
SOUTH AFRICAN ART: I am sensitive to the misappropriation of African cultural content. During several trips to South Africa, with one visit as a distinguished scholar, I had the pleasure to live with several tribes, participate in ceremonies, work with a Sangoma (medicine woman) and her protoges, and go on safari to photograph wild animals from vehicles and on foot. I practiced some art with these folks and received permission to produce my own work, but again anything more than a simple mapping collage would seem inappropriate. Here is a description of the contents in this low resolution file.
- South Africa: Overall, this "rainbow" country, known for its diversity, has eleven official languages (nine tribal and two introduced) and is roughly divided on the basis of those languages into nine provinces. Two independent nations within the historic boundaries are Lesotho (hole in the middle) and Swaziland (bite out of the eastern border). Although spoken widely and the language of commerce, English is only the majority language in Capetown and the Cape Peninsula. Afrikaans, a derivative of Dutch, predominates in the west and in parts of Gauteng, the national capital region. Each other province has a different majority language.
- Northern Cape (Afrikaans): This province contains a collection of animals native to South Africa and some rock art of an elephant herd from the San (also known as Kalahari "Bushmen" or the semi-nomadic hunter-gather people who occupied sub-Saharan Africa in prehistoric times). The San remain the indigenous population for South Africa and are the oldest known artists (drawing on caves throughout the coutry and neighbouring nations over 75,000 years ago). The animals, from left to right and top to bottom are: Zebra, Lion, Giraffe, Ostrich, Meerkat, Elephant, Buffalo, Wildebeest, Leopard, Cheetah, Hippo, Hyena, Mongoose, and Rhino.
- Western Cape (Afrikaans & English): This province shows several famous pieces of non-San rock art from the Cederberg Mountains north of Capetown including a hunter (bow and arrow), a galleon (likely of the early Portuguese and Dutch sailors who passed nearby), a whale (tail covers Capetown and Cape Peninsula), and a fishing boat. Additional animals in this province include the African Penguin, Blue Crane (national bird), Flamingos, and a pair of Dassies (like groundhogs), with a King Protea (national flower).
- North-West (Setswana/Tswana): This province contains more native animals such as the Aardvark, Pangolin (only mammal with scales), Jackal (not to be confused with the wild dog), Warthog, Crocodile, Baboon, and Wild Dog (Makanyane).
- Free State (Sesotho/Sotho): Here, Sotho people perform daily chores infront of a Rondel hut with acolourful thatched roof and a marble statue depicts the Voortrekkers' eastward journey across South Africa from Capetown to Pretoria via wagon trains (much like the westward expansion in America around the same time in history).
- Eastern Cape (isi-Xhosa): This province is famous for its language full of "clicks" and the homelands of Nelson Mandela. It presents Xhosan beadwork (the best in the nation) and additional famous San rock art, from caves in the Drackensberg Mountains near Lesotho, of Kudu and Eland (like deer and elk) that they domesticated and herded nomadically like cattle.
- Kwazulu-Natal (isi-Zulu): Items of this "warrior" population include baskets (tightly woven and used to brew beer), a shield with short spear, and a ceremonial mask (used in dances and to protect homes from evil spirits).
- Mpumalanga (isi-Ndebele, Swati/Swazi and Xitsonga/Tsonga): The classic and colourful geometric patterns are uniquely Ndebele. The Swazi weave bowls from naturally died materials. The Tsonga are known for their wood carvings and unique headrest designs.
- Gauteng (Afrikaans): The capital region is represented by a painted brick wall poster of Nelson Mandela, arguably the most popular president of South Africa, along with the "rainbow nation's" multi-coloured flag.
- Limpopo (Sepedi and Tshivenda/Venda): This province contains famous pottery from the Venda, iconic fashions from the Sepedi, and San rock art of a Springbok (antelope that is the national animal; sports teams are called the Springboks).
|
|
OPTICAL ILLUSIONS: I have very fond memories of my father (as an eye surgeon) taking me (as a preschooler) on ride-along post-operative house calls. One day, we were parked near the only traffic light in a small town waiting to see a patient and he was teaching me colours. He asked for the colours of the lights I saw. “Red, yellow, and blue” I said confidently. He corrected me and said the third light was green. Offended, I corrected him and exclaimed “NO; it’s blue!” He looked carefully and sure enough it was uniquely blue. He tried to understand his mistake. Either he had assumed the colour or perhaps mistaken it due to the backing of a darkened sky (see illumination error). At any rate, this started our first conversation about optical illusions. My dad had a great love of these because of his study of the human eye and brain connection. He inculcated that same interest in me during my youth (as you can see from more than one of the diagrams in this ePortfolio). Optical illusions are my earliest memory of being taught and learning a concept at two or three years old. Here are some favourite versions of classic optical illusions (2 & 3) that I developed from our discussions and borrowed from other more recent sources.
1. Environmental effects are usually refractions or reflections caused by changes in the densities of air or water through which light travels (examples are desert mirages of water puddles created from reflections off heated air layers, straight sticks refracting to appear bent when placed into water on an angle, and coloured flashes or dots around the sun caused by atmospheric refraction and reflection at extreme times of sunrise or sunset).
2. Physiological illusions are caused by over stimulation of the retina or brain with persistent input and include:
- apparent motion (seeing movement in static images because of pattern interactions),
- afterimages (seeing objects after deletion because they were stared at for too long),
- imaginary effects (seeing objects, not there, but in white space among other objects),
- imagining colour (colur persist as an afterimage, but not as the opposite colour), and
- white space (shapes appear in the carefully constructed blank regions or white space).
- The blind spot is an area of the retina, where all innervations converge to form the optic nerve going to the brain, and it cannot “see” objects since it lacks any photoreceptors at that point, so the brain fills in the gap with surrounding details (try the L R blind spot test below).
3. Cognitive illusions are caused by the way the brain attempts to interpret stimulation that doesn’t make immediate common sense, thus leading to inaccuracies, and these include:
- double ambiguities (at least two interpretations are possible; vase between two faces & rabbit-duck are classics),
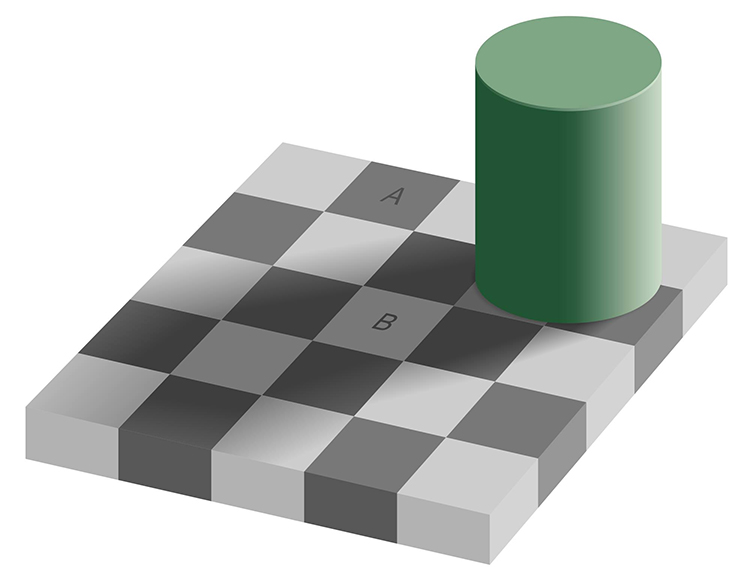
- contrast error (two colours are identical, but seem different due to the use of shadings),
- pattern error (two colours are identical, but seem different due to surrounding patterns),
- colouration error (two colours are identical, but look different due to background gradients),
- illumination error (two colours are identical, but look different due to lighting/shadow effects),
- curving straight lines (backgrounds and patterns can be used to make straight lines look curved),
- impossible objects (shapes that initially look sensible, but don't make sense on closer examination),
- spiral circles (the use of concentric circles creates a spiral effect; background patterns make it move),
- comparative lengths (objects of the same length appear longer or shorter due to their surroundings),
- size perspectives (objects of the same size appear larger or smaller due to their surroundings), and
- a variety of other famous effects.
4. Degenerative effects manifest as hallucinations: a form of optical illusion. A few of my close friends have suffered through Lewy-Body Dementia, where familiar hallucinations are an inevitable misinterpretation caused by perceptual neuron degeneration.
|
P H Y S I O L O G I C A L |
 |
 |
 |
 |
 |
Afterimages: Stare at image for 10 seconds, then look away to white background and the same image will reappear, but be black |
Imaginary Effects: Stare at one white circle at line intersections between squares and black dots will flicker in other locations |
Filling in: Most folks can see one, two, or three black dots at a time, but can you see all nine? The mind fills in the others in the periphery |
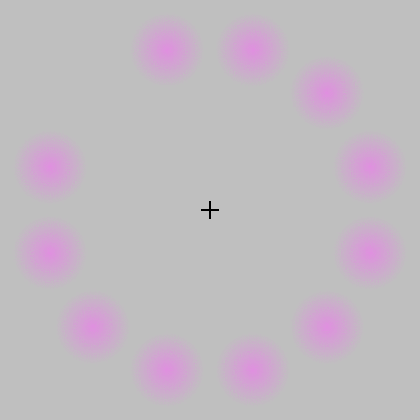
Combination: Stare at + until 1=gaps appear in the circle, then 2=you see dot afterimages and 3=all dots eventually disappear |
Blind Spot Test: close right eye and stare at L with open left eye; move closer or further until R disappears (or visa versa) |
| (click on each image to open a larger version) |
 |
 |
 |
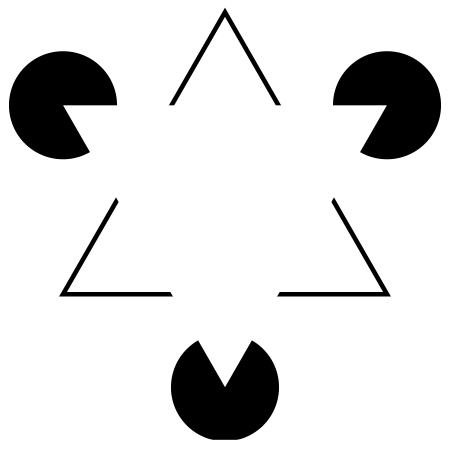
White Space Triangle: Also known as Kanizsa's Triangle, this image immediately shows a bright white space triangle on first look |
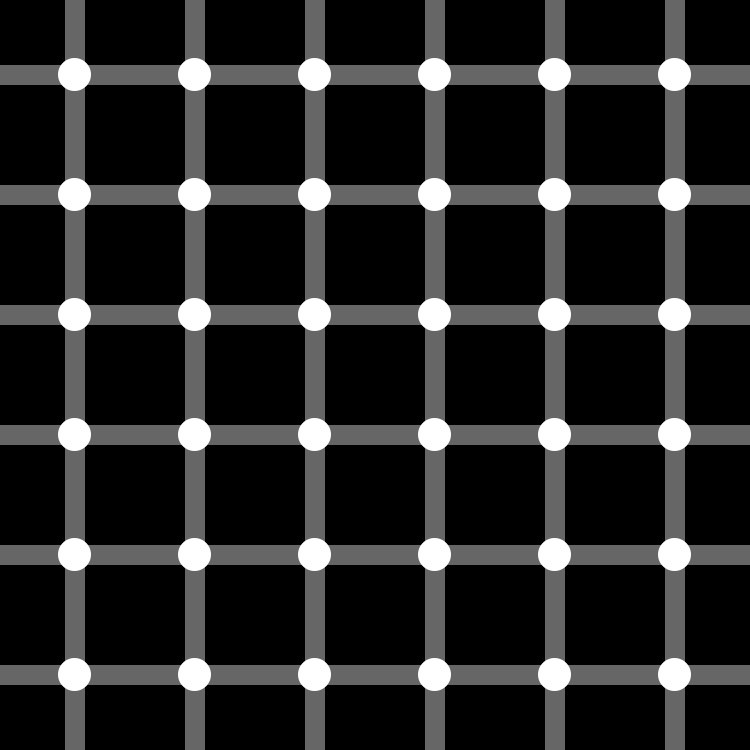
White Grid: Stare at this image long enough to see white squares or circles appear in the gaps and then longer to see diagonal stripes |
Imagining Colour: The McCollough effect occurs from a combination of afterimages and imaginary effects. To experience it, stare at the first two panels and alternate looking at the red and green stripes for about 5 minutes. Then, look at the third panel of quartered black and white stripes. Here, the vertical stripes will have a redish hue, while the horizontal stripes will have a green hue (opposite direction of the initial sets). |
C O G N I T I V E |
 |
 |
 |
 |
 |
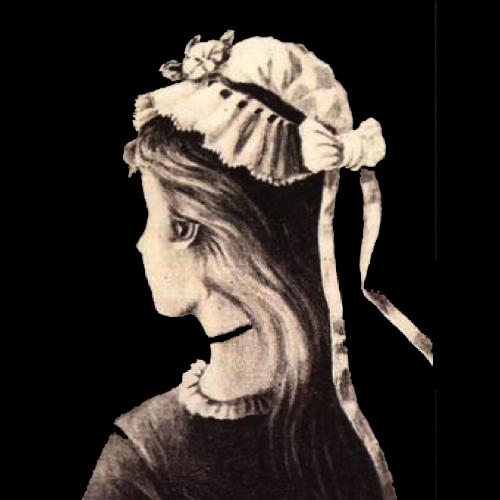
Double Ambiguities:do you see both women in this image? HINT= the chin of the younger woman is also the nose of the older woman |
Contrast Error: due to shading between X and Y halves, X and Y seem different in tone, when they are same (cover shadow to see) |
Pattern Error: due to familiar checkerboard pattern, we think A and B squares are different very colours, when they are identical |
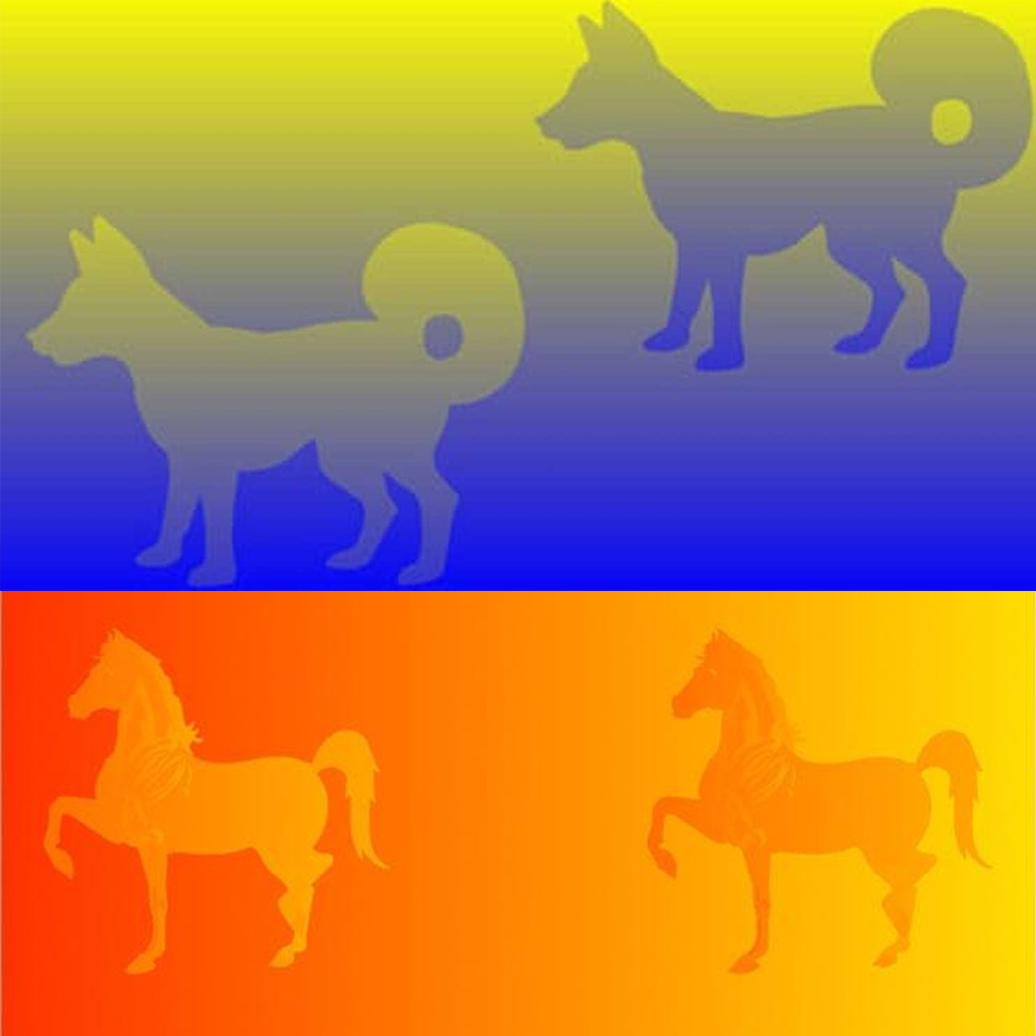
Colouration Error: light and dark dogs/Horses look different, but are same colour; the mind interprets each one based on backgrounds |
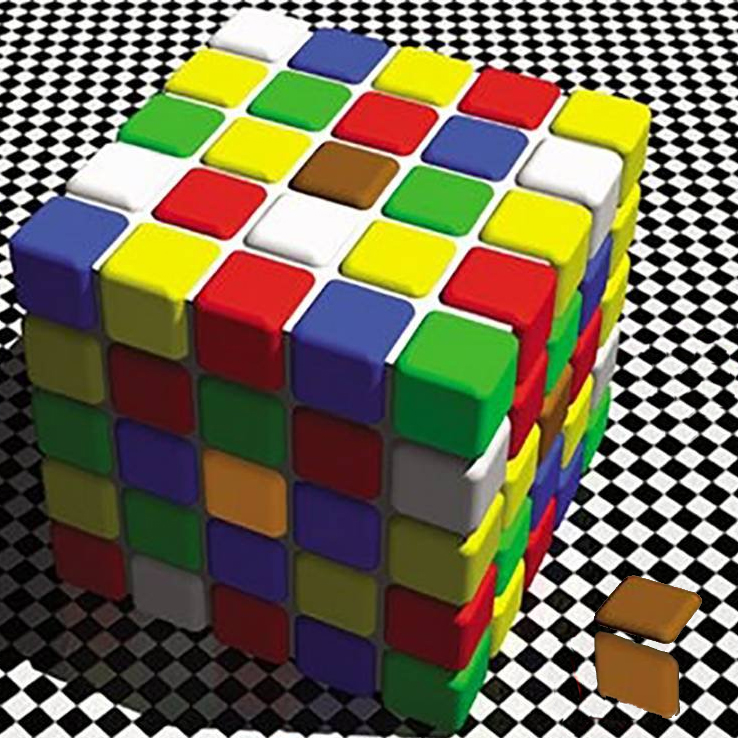
Illumination Error: In this game cube the central brown tile on the lighted side and central orange tile in the shadow are the same colour |
| (click on each image to open a larger version) |
 |
(.jpg) |
.jpg) |
 |
 |
Apparent Motion: Stare at the image until it appears to move; then continue looking and try to stop the motion in your mind |
Concave: Also known as the Wundt effect, these vertical red lines appear to curve inward )( as a result of the blue lines behind |
Convex: Also known as the Hering effect, these vertical red lines appear to curve outward () as a result of the blue lines behind |
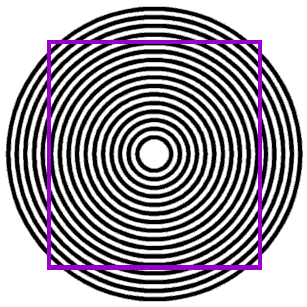
Square with collapsing sides: The concentric circle background tends to curve the lines that form the sides of this purple square |
Squircle: Not only are the square and circle distorted by the chevron pattern, but the bounding rectangle is also thrown out of whack! |
| (click on each image to open a larger version) |
 |
 |
 |
 |
 |
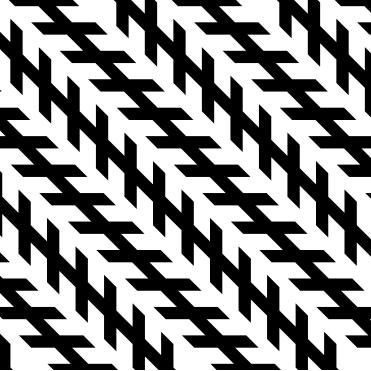
Lines: Due to the square pattern, these horizontal lines appear to be on an angle with respect to one another, but they are parallel |
Hashmarks: Adding opposing angular hashmarks to the diagonal lines makes these parallel lines seem less straight or aligned |
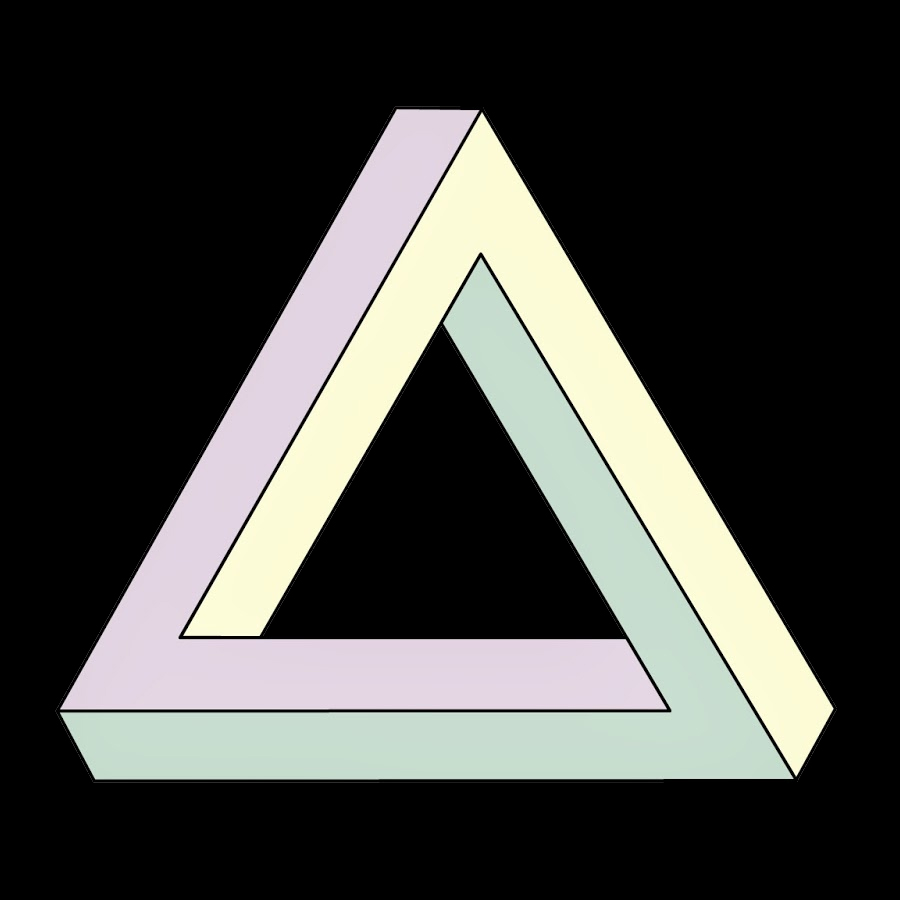
Impossible Trident: The centre tine/pring of this fork grows out of dead space making this impossible object very confusing to the mind |
Impossible Triangle: Originally from the Penrose mathemeticians, this tricky shape formed the basis of several M.C. Esher drawings |
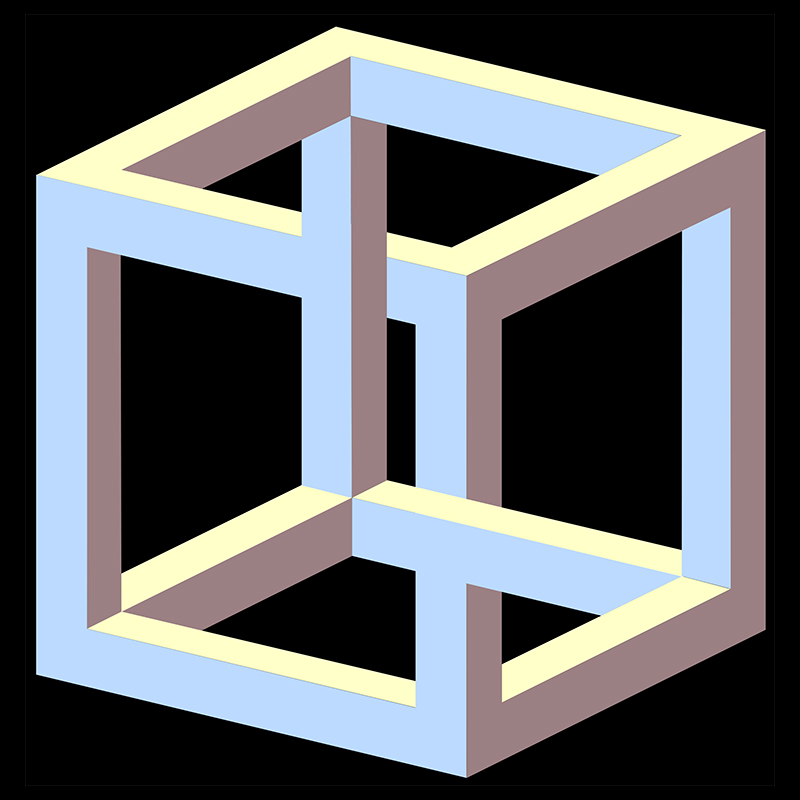
Impossible Cube: Another shape that figured prominently in M.C. Esher's artwork, this cube has heavily influenced modern art |
| (click on each image to open a larger version) |
 |
 |
 |
 |
 |
3D Kinetic Depth: On first look, which way does this dancer rotate? As you continue to stare, does the direction reverse or change? |
Spirals: This looks like spirals, but is actually concentric circles on a complex background that tricks the mind into seeing spirals |
Combination: In this image, the concentric circles forming spirals are joined with a static pattern that appears to move inward |
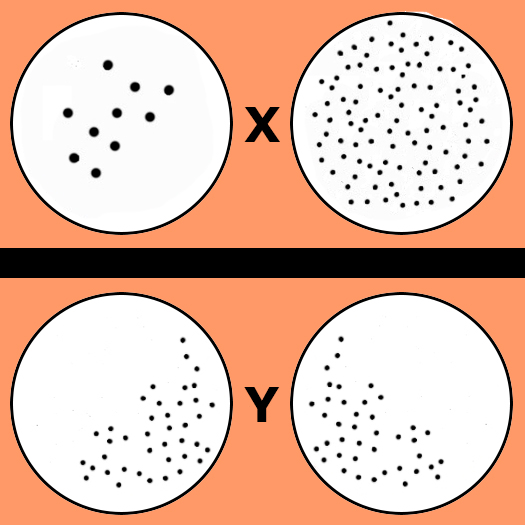
Numerosity: stare at X for 30 sec, then stare at Y and note more dots appear in the left circle, but both circles have same number of dots |
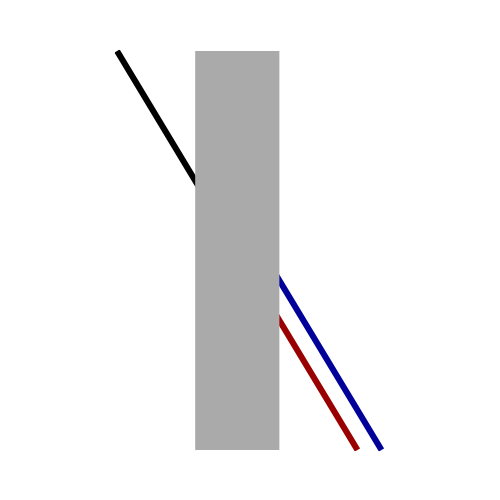
Misalignment: A straight black line appears to emerge from behind a grey shape, incorrectly following the blue line's path; red is correct |
| (click on each image to open a larger version) |
 |
 |
 |
 |
 |
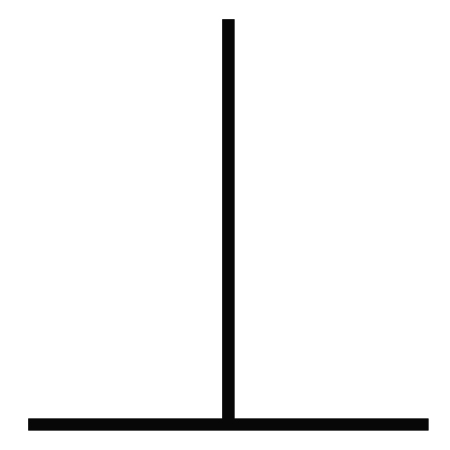
Upside down T: which of the two lines is longest? Both are the same length, but the vertical line without an intersecting line seems longer |
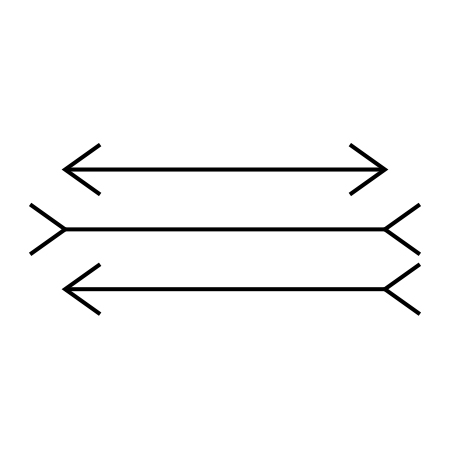
Arrows: Which of the lines between the arrow heads and/or tails is shortest? All three are the same length, the <> distract us |
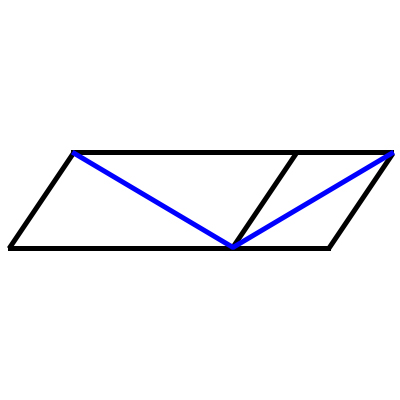
Parallelogram: Which of the blue lines is longest? Both are the same length, but the left line appears longer inside its bigger space |
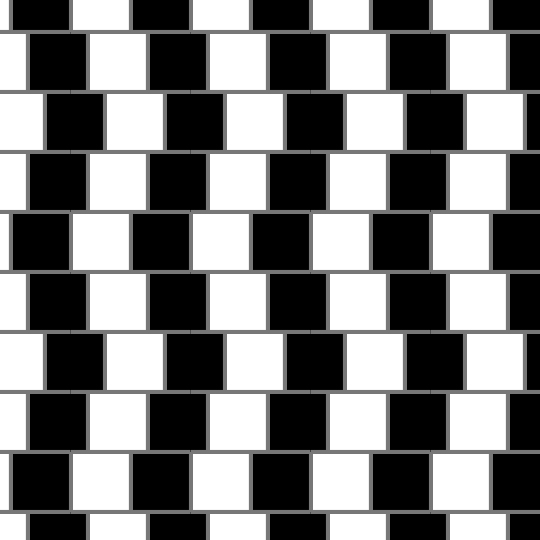
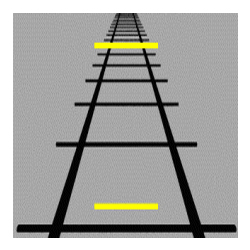
Railway: Which of the yellow lines is shortest? Both are the same, but the widening track perspective makes lower one seem shortest |
Train Track Curves: Which of these sections is longest? They are the same, but one appears shorter due to a side by side comparison |
| (click on each image to open a larger version) |
 |
 |
 |
Missing Square Conclusion: How does this animation work? Where does the missing square come from? Why is this "magic" possible?
(all images original by Simon Priest or taken with permission from Wikipedia public domain) |
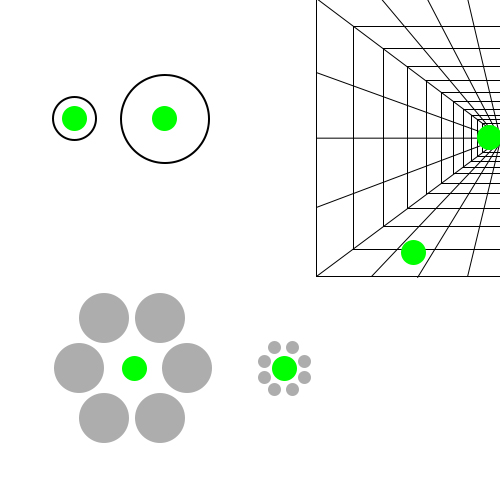
Sizes: Some comparisons of the above green objects give differing size perspectives , despite these objects all being the same size |
Say the colour, not the word: The great challenge here is naming colours that are seen, rather than reading all words that are written |
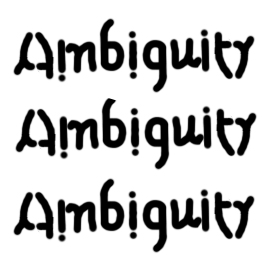
Ambigram: An image of a word that looks the same when viewed from different perspectives (look upside down at Ambiguity above) |
|
|
THE KEYPEN FOUNDATION: I started this international charity in 2005 with my share of the investment return from the sale of virtualteamworks.com and focused it on social justice and environmental issues. It took on a number of special projects that started with planting trees in developing nations around the world. The money stretched further in developing nations, because costs were less than at home, locals benefitted greatly from the employment, and the trees can be planted anywhere in the world to scrub carbon from the atmosphere.
The foundation has supported a number of other environmental projects. We funded reproductive research with giant and red pandas in China, sustained conservation efforts with South African elephants and rhinos in Hluhluwe-Imfolozi, and maintained water systems for the plateau-dwelling Tarahumaran of Mexico. Here are some social justice projects we have worked on. None were sustainable: machines broke, things got messy again, and eventually the project money ran out.
John Chen (business partner for virtualteamworks.com and geoteaming.com) took me to a Microsoft go cart track in 2002, where we got to race a newly debuted invention called the Segway: a two wheel, gyroscopically balancing, personal scooter. Recently invented by Dean Kamen of Deka Enterprises, we got to talking with him and became fast friends. Dean shared a number of his other inventions: an elevating wheel chair that raises the occupant to standing eye level (based on Segway technology), a dialysis machine (his first invention), and the prototype for a Slingshot or vapor distillation water purifier (based on dialysis technology). My life partner and I loved the latter, because we poured urine into the machine and drank the purified water that came out!
We purchased three Slingshots and took them to the Madikwe region of South Africa and Botswana in 2006, where safe water was impossible to obtain due to a schistosomiasis (snail parasite) epidemic, and set up small businesses within the Tswana tribal groups. Before we selected this region, and for the other regions we chose later, our criteria were quite simple: lack of safe water and declining population. Not wishing to contribute to global over-population as a consequence of successful efforts in rapidly growing regions, this region (suffering from both the AIDS crisis in Africa and the parasitic epidemic) was our best choice for making a big difference.
With guidance from Dean and his friends, we placed the units in three different villages. A group of people took responsibility for operating the Slingshot. Its process was powered by a Sterling engine that ran on dried dung as fuel. The group paid children to collect fuel for the engine and to collect contaminated water. The purified water was sold to villagers or they contributed fuel and contaminated water in exchange for purified water. When the unit was not in use purifying, the engine generated electricity to power the village overnight. The electricity was sold and a micro-economy developed around the machine and its processes. This pilot project, also conducted by others in several different nations, has grown into hundreds of similar efforts throughout Africa, now sponsored by Coca-Cola in partnership with solar power companies and Internet resources.
After climbing Kilimanjaro in 2010, with access from Kenya and egress to Tanzania, Mike Gass, his family, and I gave back to those countries with duffle bags of cold weather clothing for the Kenyan porters and some cultural development projects for the displaced Hadza tribes near Arusha. We gave backpacks, dictionaries, and other school supplies to the children of the village. We spent time playing with orphans and fixing up their orphanage. We re-catalogued and re-organized all the books in their small library. We sterilized their tiny health clinic and the foundation later sent the necessary medical equipment that fulfilled their entire wish list.
Finally, my father was born in India and lived there for the first eighteen years of his life. As a British citizen, he had a very privileged life growing up in the Raj. Years later, as an eye surgeon, he returned to India to offer the first of many disaster medicine reliefs for surviving victims of the Bopal cyanide gas tragedy of 1984. Cyanide dissolved in the fatty tissues of their eyes and he treated thousands who survived the initial leak. He set up several charities in Bopal and around India. When he died, I took his ashes there and spread them around some of those projects. In his memory, the foundation continued funding several educational projects on his behalf. These included health clinics, training hospitals, language schools, a computer school for blind children, a school for the hearing impaired, and an ashram for lepers with agricultural land to grow their own food. The ashram took all the beggars off the streets of Bopal. When the lepers married and had disease-free children, these kids were still labeled “untouchable” and not allowed to go to public schools for fear of infecting others. So he built them their own school. When I met the lepers and their children in the ashram’s community center, they held my hands and told me, he was the only one who was willing to touch them and what that had meant to everyone. |
|
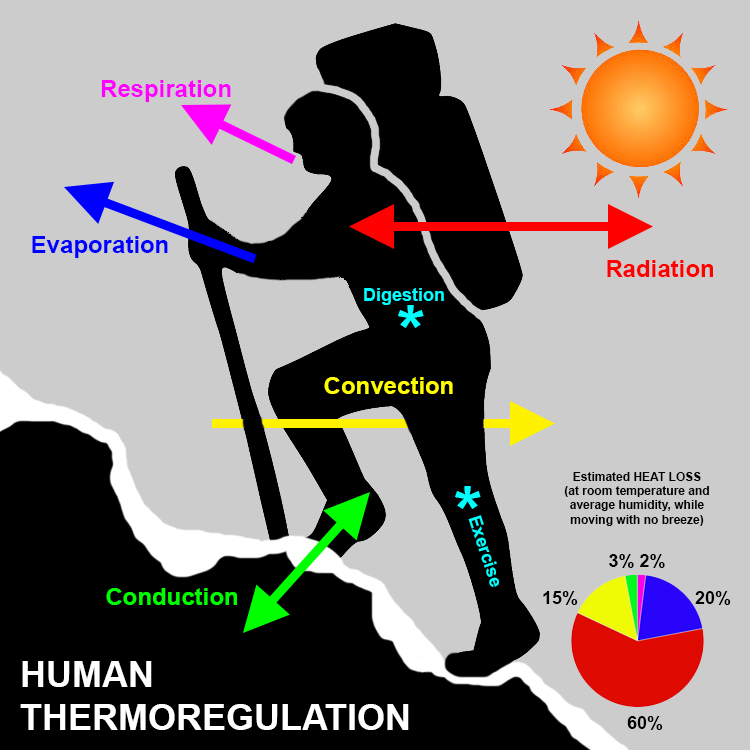
HUMAN THERMOREGULATION: I wrote an article on this topic with Mike Strong back in the early 1980s. It was reproduced in many publications, so here is a brief summary of the main points.
Humans attempt to maintain a body temperature of 37C/98.6F (thermostasis) by generating heat and regulating heat loss. For example, humans shiver as a means to warm up, when body temperatures drop a degree (mild HYPOthermia). Furthermore, humans also sweat, if their body temperatures rise a degree (mild HYPERthermia).
The following tables explain two mechanisms of heat generation and five mechanisms of heat exchange. Use this knowledge to your advantage when attempting to regulate body temperatures in the outdoors.
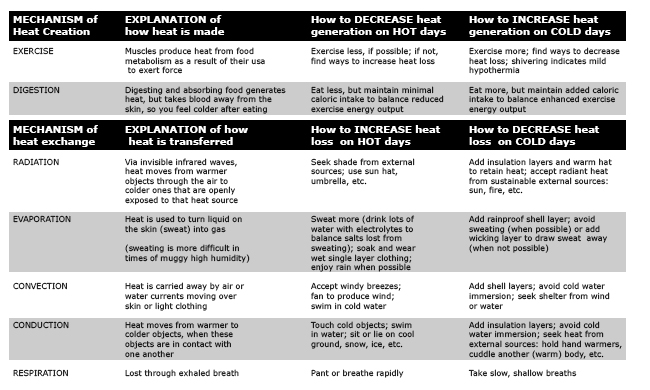 The best advice for any thermoregulatory situation in the outdoors is to dress in layers and carry these four layers with you as dictated by the seasonal and environmental conditions: single wicking layer (draws sweat away from skin), double insulation layer (wool/fleece AND down/synthetic), single shell layer (windproof and waterproof). Layers may be combined as needed depending on the circumstances. Specialized layers may be necessary for some activities, such as neoprene wetsuits for water sports. |
|
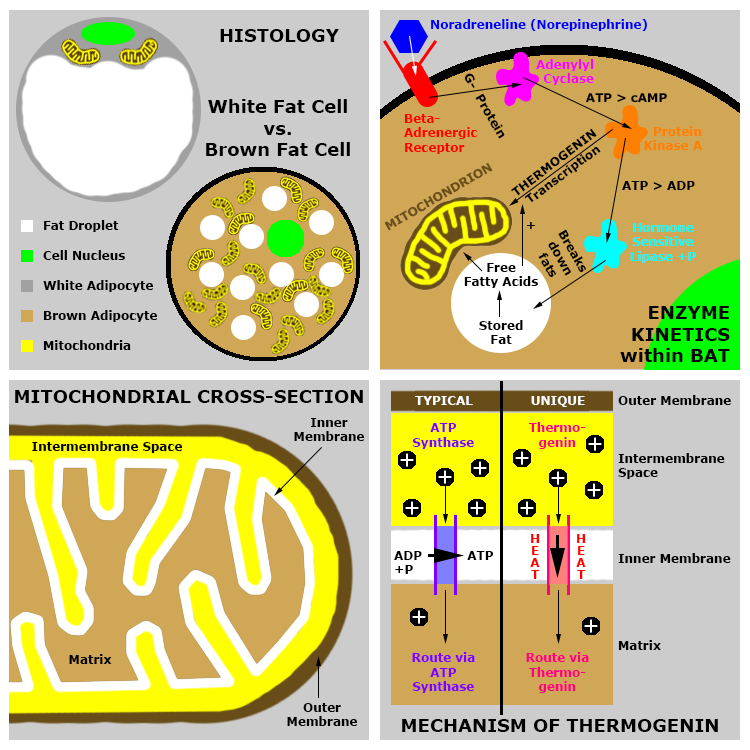
THERMOGENIN IN BROWN ADIPOSE TISSUE: My undergraduate degree is in Biochemistry and for my Honour’s Project, I studied Non-Shivering Thermogenesis in Brown Adipose Tissue. Please bear with me as I attempt to explain this complex topic in more detail for those who have asked.
Human body fat (adipose) comes in two forms: white and brown. White fat is used to generate energy for body needs (like exercise) and is abundantly present in humans. White adipocytes (cells) contain a single fat (lipid) droplet (like oil) and very few mitochondria (the cellular structure that is an energy engine). Brown fat is used to generate heat to keep the body warm, but is very sparsely distributed in adult humans (it is more common in new born humans and hibernating mammals, where staying warm without the ability to exercise is a necessary piece of “survival of the fittest”). Brown adipocytes contain multiple droplets and a great many iron-rich mitochondria which give it a brown colouring.
Humans generate heat (thermogenesis) by several means: through exercise, as a bi-product of chemical metabolism, and by shivering or non-shivering methods. In the initial three methods, heat is the result of fuels being aerobically metabolized (burned or chemically converted in the presence of oxygen) into water and carbon dioxide within the mitochondrial energy engines. Through this process, and the use of many metabolic steps, one sugar molecule (glucose, formed from fats) can produce 38 ATP (Adenosine Tri-Phosphate) molecules which store high energy for later use by the body muscles and other organs. Metabolizing ATP molecules during muscular exercise or other work will release lots of energy and heat.
In the last method, non-shivering thermogenesis, the normal energy production process is decoupled or separated so that only 2 ATP molecules are generated and the leftover energy (that would have gone into forming the missing 36 ATPs) is simply released as heat to warm the body. This explains why so many mitochondria are present in brown adipose cells and why so much brown fat is present in hibernating mammals. The molecule that uncouples the energy production process in mitochondria, called Thermogenin, was originally discovered in 1978.
By 1980, biochemists believed that white fat could be converted to brown fat and that humans could therefore lose weight via this conversion. Pharmaceutical companies funded our 1981 research in the hopes that a pill could someday cause the conversion and then be prescribed for human weight loss. As an aside, thirty years later, evidence was found that sympathetic nervous stimulation and noradrenaline secretion leads to the conversion of white to brown, but the magic pill still remains elusive to this day.
As a budding researcher, I was assigned to replicate and extend the original research of those scientists who discovered Thermogenin. My work confirmed and supported their original findings in hamsters. The diagram below shows our understanding of how the process worked at that time with Thermogenin (now called Un-Coupling Protein 1 or UCP1, because other related variations have since been identified).
In response to cold stress, the sympathetic nervous system secretes noradrenalin (norepinephrine), a hormone and neurotransmitter, that binds to a Beta-Adrenergic Receptor on the cell membrane. Once this hormonal activator binds to the receptor outside the mitochondrion, it releases a G-protein inside to activate Adenylyl Cyclase. The Adenylyl Cyclase enzyme catalyses the conversion of existing ATP stores to cAMP (cyclic Adenosine Mono-Phosphate). The presence of elevated cAMP levels encourages another enzyme, Protein Kinase A, to add a phosphate to Hormone Sensitive Lipase, thereby activating it. This latter enzyme proceeds to break up stored fat into free fatty acids that become available as fuel for the mitochondrial energy engines. The intermediate enzyme, Protein Kinase A, along with the rise in free fatty acids, also brings about the creation of extra Thermogenin (transcribed within the cell nucleus, for use inside the mitochondria). Elevated levels of the former enzyme, Adenylyl Cyclase, also ensures a gradient against further ATP formation thereby enabling additional heat release to warm the body.
The mitochondria has several important features as shown: the outer membrane, the inner membrane, the intermembrane space (between both), and the matrix (the guts within the inner membrane). The insides contain folds of the inner membrane to create cristae or peninsula like protrusions that increase the surface area for enhanced molecule transfers and chemical reactions. The matrix is where most of the energy conversions take place (Kreb’s cycle, ATP synthesis, and fatty acid oxidation), but across the inner membrane is where Thermogenin works its magic by increasing the permeability to allow protons to “leak” back into the matrix from the intermembrane space, thereby decreasing ATP production and increasing heat generation instead. So far, Thermogenin has only been found in brown adipose tissue.
In summary, we can compare the typical creation of ATP (as carried out by mitochondria in almost every cell in the human body and in most other plants and animals) with the unique generation of heat (as produced only in brown adipose mitochondria). Typically, protons (hydrogen ions without their electron) are pumped from the matrix into the intermembrane space across the inner membrane. The initial energy to transport the protons is provided from the breakdown of metabolic fuels (fats, carbohydrates, and proteins). This pumping of protons creates an energy gradient from one area having few protons and the other area having many, much like the electrical potential created by batteries. In fact, the human body also moves electrons in a similar manner to create micro-voltages for nerves, muscles, and other tissues. This same electron transport chain is also necessary to pump protons.
Once the gradient is established, protons are allowed to slip back from the intermembrane space into the matrix through ATP Synthase, the enzyme found in the inner member that synthesizes ATP from ADP and Phosphate using the energy released by protons flowing back. Thermogenin provides a short cut for protons by opening a portal that allows them to slip back without their energy being used to make ATP and so their energy is released as heat. An abundant vascular system of capillaries distributes the heat throughout the body and, as warming occurs, noradrenalin secretion diminishes. This feedback along with other inhibitory mechanisms turns off the brown adipose tissue until it is needed again. |
|
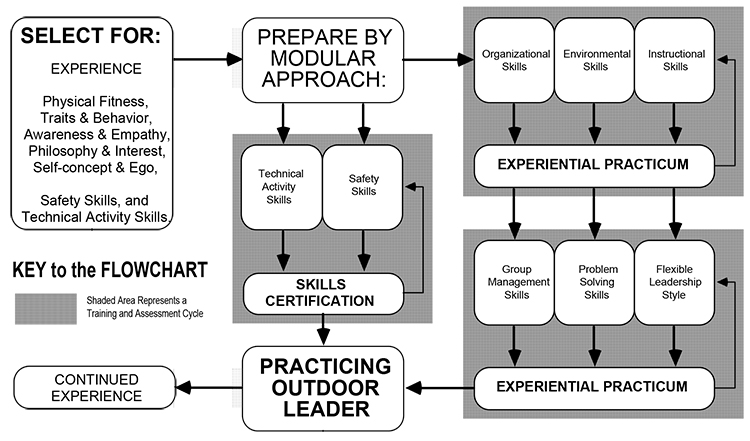
MAGISTERIAL THESIS: For my master's research, I asked North American experts to share their perspective on outdoor leadership competencies and this eventually led to the model of preparation diagrammed below. This was conducted in person at an AEE conference in Wisconsin. It was the first conference that I ever helped organize and I have fond memories of the steering committee meetings. It was my introduction to AEE. It was also my first foray into social science research. Up to this point I was trained as a natural science researcher. |
|
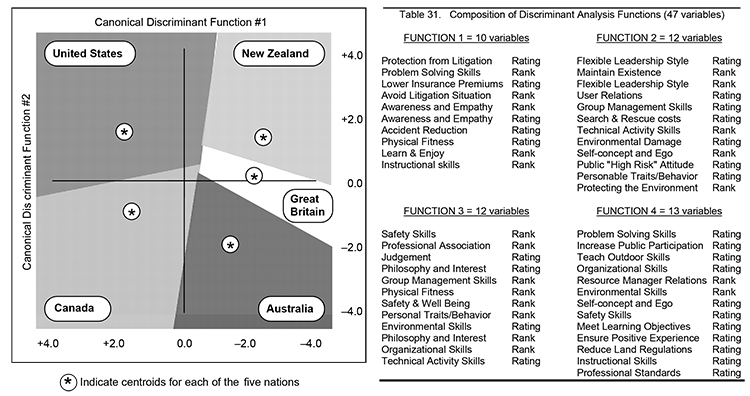
DOCTORAL DISSERTATION: For my doctorate, I asked international experts about outdoor leadership. The experts could all trace their nation's development of outdoor leaders to a common parent: the British system. Using Canonical Discriminant Function Analysis, I was able to show that their responses split them into five distinct groups using four exclusive functions. A function is a collection of variable responses as shown below. For example, Function #1 is composed of several items related to legal and accidents that are used to separate the Canadians and Americans (who perceived these as more important) from the Kiwis, Brits, and Aussies (who saw these as less important). Function #2, related to a combination of other items, was used to draw the nations further apart from one another, and so on. Even though experts from these countries were in agreement about the importance of each competency, they differed enough to be seen as nationally unique in their perspectives. A copy of the dissertation can be downloaded HERE. |
|
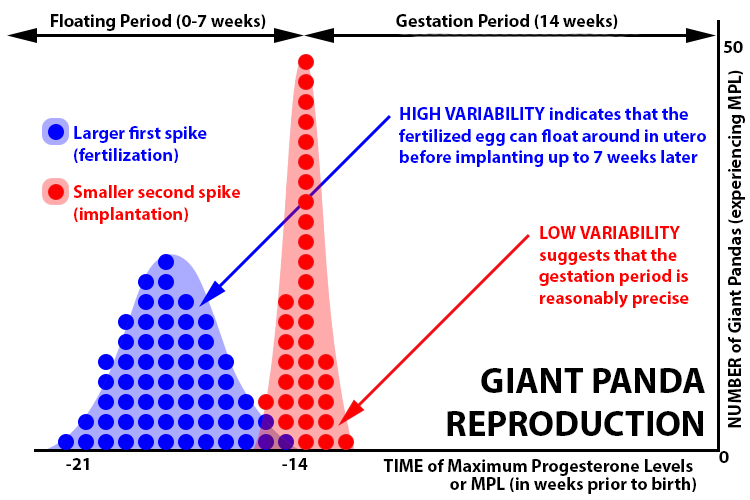
PANDA REPRODUCTION: After a 2005 conference, I was invited as a visiting statistician with the Giant Panda Breeding Research Center in Chengdu. This was a collection of geneticists, endocrinologists, and reproductive specialists, but no statisticians, who were dedicated to studying and enhancing the population of giant pandas in China. The giant panda ovulates once a year, remains fertile only for a couple of days, and shows little or no interest in copulating when kept in captivity. Therefore, all insemination had to be artificial.
After a public lecture on statistics during my visit, I was asked to examine a data set of the progesterone levels for 80 giant panda pregnancies. The researchers were attempting to determine the gestation period of the giant panda from fertilization of the egg to delivery of the newborn cub. Their data showed great variability across a range from 14 to 21 weeks. In order to understand the study, I engaged in the daily panda routine of feedings (with supplemental herbal medicines), through collecting urine and feces, to conducting hormonal assays in order to determine progesterone levels.
Progesterone is a naturally occurring sex hormone that facilitates body changes, mostly in females (due to the amplification effects of estrogen). Progesterone plays a reproduction role in preparing the endometrial lining of the uterus for pregnancy, accepting or protecting a successful implantation, and developing breast tissue for later lactation. A drop in progesterone signals the start of labour and readiness to lactate. A spike in progesterone signifies fertilization of the egg and its implantation in the endometrial lining of the uterus. As a result, this spike is an excellent indicator of the gestation period in humans: our babies typically arrive 40 weeks after fertilization and implantation according to a corresponding progesterone spike. However, the situation turns out to be quite different in giant pandas, hence the highly irregular 14-21 week period, including several weeks of unexplained variability.
On further analysis of these data, we found that giant pandas experience two progesterone spikes! The first indicates fertilization and the second signals implantation. When we separated the data for each spike and compared these to the date of cub birth, we found that all the variability was associated with the first larger spike (anywhere from 0 to 7 weeks), while the second smaller spike showed consistency by appearing 14 weeks before birth (give or take a few days). We hypothesized that the gestation period was a firm 14 weeks, but that the fertilized egg could float around in the uterus for up to 7 weeks before implanting in the panda’s endometrial lining. During this period of floating uncertainty, an egg may fail to implant (later being expelled) and the panda may have appeared pregnant (due to the large first spike with subsequent maternal behaviour), but did not give birth (from implantation failure). This incident explained the common misdiagnosis of pseudo-pregnancy. Consequently, researchers have learned to better identify the second smaller spike and to predict gestation from this latter event alone. |
|
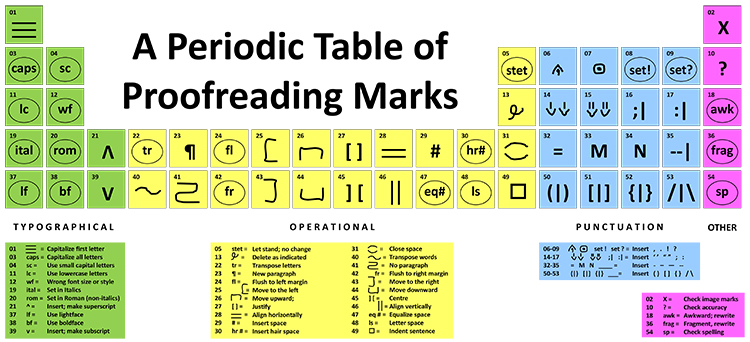
PERIODIC TABLE OF PROOFREADING MARKUP: I was a chemistry nerd in high school and loved the periodic table of elements arranged into specific groups based on similar properties resulting from comparable electron orbits. Back then, I had memorized more than eighty elements in their relative positions, but today I doubt I could remember the first twenty. When I started writing books, my editors began putting all these squiggly marks on my hand and typewritten manuscripts (no personal computers in the 1970’s). I had no idea what those proofreading marks meant, but I had to learn about fifty of these and so I organized them into a periodic table based on their similarities. |
|
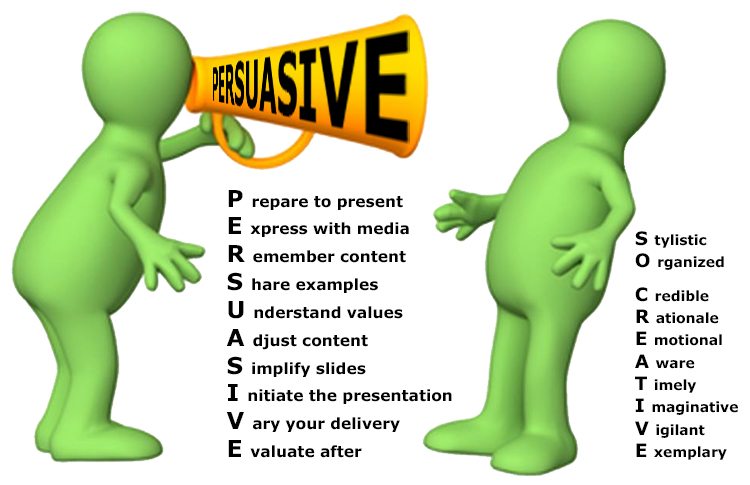
RHETORIC & CREATIVITY: WHO says WHAT via WHICH media to WHOM for what IMPACT? Rhetoric is the art and science of communication (oral, written, or technological media) used by a presenter to enlighten, convince, or inspire an audience. One possible end product is that some members of that audience may learn by transforming the way they feel, think, behave, or resist change. To accomplish this transformation, the presenter employs an intermediary process of reasoned discussion with the audience, who may hold differing belief systems, to reach a common truth. This dialectic discourse forms the basis of peaceful conflict resolution and should not be confused with competitive debate (having winners and losers). This approach ought to be the fundamental methodology of all democratic procedures, however, these sane guidelines are often absent in today’s insanely polarized society!
The dialectic approach comes to us from ancient philosophers who gave us elements that are critically important to formulating a positive and persuasive argument to alter the minds and actions of others. These include three classic Greek methods of appeal: logos (the logic or evidence behind a particular perception), pathos (the emotional or affective basis of that viewpoint), and ethos (the moral character, history or expertise of the presenter). To these three we add five Roman canons or bodies of rules for rhetoric: inventio (conceiving the components of a convincing perspective), dispositio (arranging those components into a compelling viewpoint), elecutio (crafting the presentation with clarity, style and grace), memoria (fully knowing the subject matter and related areas) and pronuntiatio (delivering the message with oratory influence and impact). I added some more about presenting ideas with modern technology (unfamiliar to the ancients) and organized these elements around the acronym PERSUASIVE.
- Prepare to present: Follow the five canons to create your premise. Generate ideas (inventio), organize these into an effective position (dispositio), stylishly draft a presentation around this position (elecutio), know more than just your own material (memoria), and present it all with passion (pronuntiatio). To formulate the presentation, follow a typical structure: introduction, factual background, outline of your argument, presentation of points in detail, discussion of alternatives, summary, and conclusion. Be sure that the summary matches the outline and that the conclusion recapitulates the introduction. Next, consider answering these two questions. WHERE are you presenting: do you know if location environs are conducive to learning? WHEN is your time up: does the estimated duration of your presentation fit into the allotted interval? Once your presentation is well formulated, you can enhance it with the following suggestions.
- Express with media: Consider slides. A picture is worth a thousand words, so reduce the written text. Add a diagram, video, and audio recordings. Graph statistics, link to high quality websites, demonstrate your point, ask questions, and open with a personal anecdote, but not a joke.
- Remember content: Knowing your own material is not enough, you must know the surrounding content (logos) in order to be ready to answer questions, respond to counter arguments, take advantage of teachable moments, and improvise if and when the need arises.
- Share examples: The emotional appeal (pathos) of an argument can be fervently articulated through illustrative case studies, quotes, stories, metaphoric links, and imagined scenarios.
- Understand values: Not only is a self examination of your own values necessary, but also a close scrutiny of the audience’s values (ethos). Are you ready to meet and exceed their needs? By knowing both value sets, you can identify discrepancies that might inflame existing differences and/or lead to further conflict. Answer these four questions. WHO are your audience: are they intelligent and experienced? WHAT do they expect: are they anticipating formal instruction or informal entertainment? WHY are they there: will they be coerced, eager, happy, tired, and/or angry? HOW do they learn best: do they enjoy lecture, demonstration, or experiential?
- Adjust content: Adjust the prepared presentation to suit the values and needs of the audience. Again, remember to appeal from your credibility (ethos) to their emotion (pathos) and logic (logos) through your writing and/or public speaking. Establish your technological, written, or oral credibility with clarity and brevity, but without contradiction or error in the content. Appeal to logic and emotion by providing plenty of evidence to corroborate your position and drawing out their feelings about the argument. Revise the presentation over and over until it is perfect.
- Simplify slides: In a PowerPoint/Keynote dependent setting, presenters can overwhelm their audiences with too much detail and too many slides. Here are some tips to improve your slides. Avoid paragraphs, unless sharing a quote. Use uncomplicated diagrams, crisp/clear fonts, and uncluttered photos. Don’t use cheap looking clip art or overpower with animation (some folks like to use all the software’s bells and whistles). For the colour scheme, use three or less choices and match these by complimentary characteristics on a colour wheel. Use contrasting colours to highlight differences. Generally, darker colours indicate solemn and serious, while lighter ones suggest fun and friendship. Desaturated colours tend to be professional, while saturated ones are for children. For titles, use a font type that is different from that used in the main text. Make sure these font sizes are large enough to read from the back of the room. Rarely use all caps or underline (except for hyperlinks). Make important content big or bold and place it strategically on the slide (see photography A-G for more creativity suggestions). Arrange slide content so everything connects on the slide as it does in reality and put closely related items close together. Understand the use of white, neutral, and negative space as components of design. The slide show should not be the entire event, but ought to augment your presentation.
- Initiate the presentation: Be sure to outline a route map for where you intend to go, stay on course (veer off only for genuine teachable moments, but not tangential thoughts), and provide occasional signposts or mileage makers to show where you are on the map from time to time. Many presenters will need to practice their oration skills such as annunciating clearly, loudly, and at a speed that allows the audience to fully absorb the information you are presenting.
- Vary your delivery: Nothing bores and loses an audience like a lack of variety. Depending on their reaction to your initial presentation, shift your delivery. Practice and use these techniques. AVOID: looking at your notes or slides on the screen, indicating disinterest, and mumbling monotonically. DO: make eye contact, smile, act naturally, be yourself, speak clearly, and show confidence. Match natural facial expressions and body language gestures with the presentation content. EMBRACE: demonstrating good posture and moving slowly around the available space (unless online). When online, use an audience response system to measure their engagement. In all speaking cases, vary your oratory tempo, pitch, volume, tone, and silence.
- Evaluate after: At the very least, get some feedback from the audience. What did they learn? How does this fit into their daily lives? What will they commit to do differently in the future? At most, conduct a learning assessment and monitor long-term behavioral change toward action.
I believe that creative people are very persuasive. Consider the classic Greek appeals (logos, pathos, and ethos) and the Roman canons (inventio, dispositio, elecutio, memoria, and pronuntiatio), plus a couple of more (kairos and imitatio). These can similarly be combined to make each of us SO CREATIVE.
- Stylistic (elocutio): be ready to make your idea a colourful expression your personality and character.
- Organized (disposito): arrange your ideas, challenges, and life around professionalism and influence.
- Credible (ethos): establish and sustain your believability as an authority with moral character.
- Rational (logos): base ideas on logical data; creative ideas without logic become crazy schemes.
- Emotional (pathos): consider the importance of people’s affect and how to make them feel.
- Aware (memoria): update your understanding about underlying and related subject matter.
- Timely (kairos): Pitch during opportunity; creative ideas become amazing solutions at right time.
- Imaginative (inventio): invent new ideas; look for the opportune intersection of need and change.
- Vigilant (imitatio): continually look to improve existing ideas; build a better mousetrap or light bulb.
- Exemplary (pronuntiatio): In everything you do, exude excellence, add credibility, and model action.
|
|
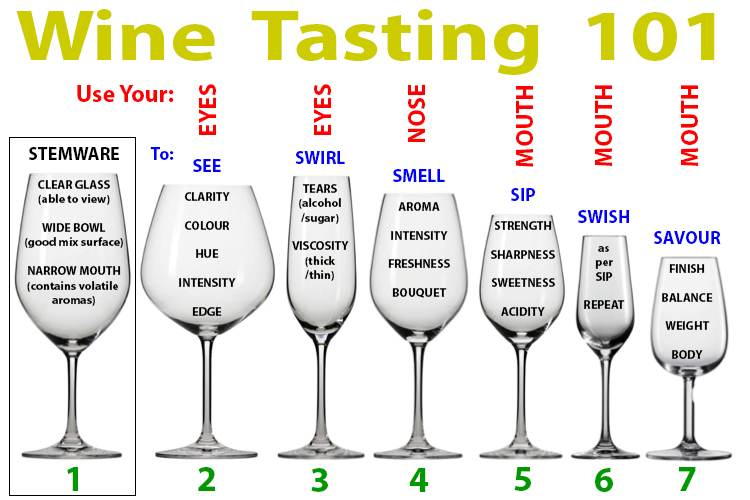
WINE TASTING 101: Brock University is located in Canada’s best vineyards: the Niagara Peninsula. We had an Oenology Institute and its first director, Mary Frances Richardson, was instrumental in helping me get early tenure and advanced promotion to Full Professor. I returned her assistance by offering a public course in wine tasting through the campus to community outreach programs.
I like good wine and have enjoyed sampling local wines in dozens of countries around the world. I taught beginners using this simple sequence of Seven “S” Steps, but emphasized that tasters should feel free to change the sequence, break the rules, and enjoy wine anyway they like. Wine tasting is a personal experience and should not be unduly influenced by fads or fashions. Drink what you like and like what you drink. Don’t let a wine snob (including me) tell you what you must be doing, but here are some suggestions.
PREPARATION: Avoid wearing any personal scents/perfumes during a tasting as these can interfere with others’ senses of smell. Taste in the order that the resident expert recommends and save the sweetest wines for last. Between tastes, optionally cleanse your palate with water or a flavourless cracker. Unless complimenting with food, avoid eating before or during a tasting (except crackers). Be prepared with pen and paper to make detailed notes on each sample tasted.
- STEMWARE: Ignore the fact that these come in a variety of shapes and sizes that are intended for specific kinds of wine. Stemware should be made of clear glass, but with narrow mouth and wide bowl, because a narrow mouth contains volatile aromas, while a wide bowl provides good mixing surfaces. Hold your glass by the stem, not the bowl, to avoid transferring body heat that might inadvertently warm the wine. For tasting, a clean glass should be less than a quarter full.
- SEE: Hold your wine in front of a white background (paper, shirt, etc.) in natural light and inspect the wine for clarity, colour, hue, and intensity. Cloudiness often indicates undesirable sediments. Wine colour ranges from white (colourless water – deep gold) to red (light pink – almost black) and indicates the type of grapes fermented (some examples include WHITE: Chardonnay, Chenin Blanc, Pinot Griz, Riesling, Sauvignon Blanc, Semillon & RED: Cabernet Sauvignon, Gewurztraminer, Greache, Merlot, Pinot Noir, Syrah/Shiraz). Darker hues suggest warmer regions for grape growth, while lighter hues suggest cooler climes. However, reds lighten with age, while darker whites tend toward being sweeter than most others. A defined edge to the wine, where intensity does not fade at the rim, indicates a high quality wine.
- SWIRL: In order to determine viscosity, circle your glass by holding the stem, so that the contents wash up against the sides of the bowl without spilling. Look for tears that cling to the sides of the glass after swirling. These designate a desirable high alcohol and/or sugar content.
- SMELL: After swirling, take a deep sniff to assess the “nose” of the wine. Examine freshness, aroma, intensity, and describe the bouquet in association with familiar flavours of foods such as: citrus, fruits, nuts, peppers, woods, leaves, flowers, sweets, breads, butters, etc.
- SIP: Taste a very small mouthful and draw some air over the wine before swallowing. Record your initial impressions about the balance of alcohol strength, sharpness, acidity, and sweetness.
- SWISH: Hold a small mouthful and avoid swallowing. Roll the wine around in your mouth to cover all your taste buds. Again, suck air over the wine. Record your thoughts compared to sip.
- SAVOUR: Drink a medium mouthful and examine the finish (aftertaste, how long it lingers). Describe the balance (acids vs. tannins), weight (alcohol content), body (mix of fruitiness with alcohol), and “feel” of the wine in your mouth. Sharp raw wines have too much acid, while dull flat wines have too little. Full bodied wines are fruity and alcoholic, while light wines are crisp.
|
|
PHOTOGRAPHY (A2G): I've volunteered to teach photography since 1980. Back then, I dreamed up the "from A to G method" by analyzing my own work and thought processes. I have found it a valuable sequence for teaching and taking photos. WARNING: images are from before 1983 (scanning the original film slides in 2003 hasn't made them as crisp as I would like, but you get the basic idea). The order goes something like this:
- A = Assess - what are your reasons for taking the image?
- B = Be creative - follow creative tips & tricks!
- C = Composition
- D = Depth of Field
- E = Exposure
- F = Focus
- G = Go!
|
|
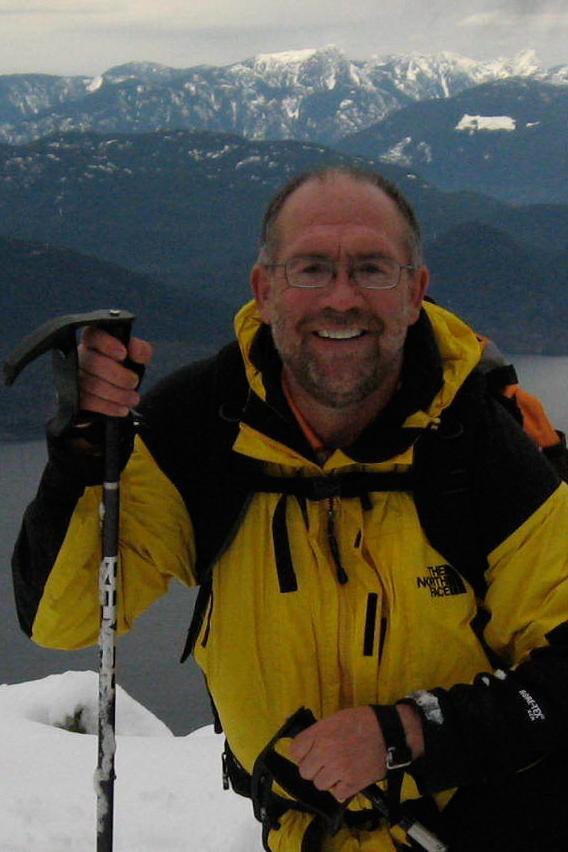
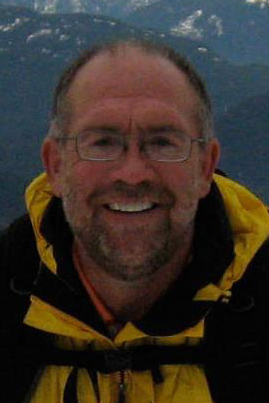
MY PHOTOGRAPHS: The 2 paired photos below are the best I can offer right now for folks who need recent pics of me for talks I might give or learning sessions I might facilitate. Click on your choice to get its full sized version. |
|
|
MY BIOGRAPHIES: A friend specializing in PR & Communications, Shelby Chamberlain, wrote these bios of different lengths. Again, people who need bios for conferences may want to copy and paste the bits they like. |
TECHNOLOGY, TEACHING & LEARNING (<100 words)
Dr. Simon Priest has led university teaching and learning centers, managed continuing education schools, and studied teaching excellence for over two decades. As an education professor, he has taught courses for faculty and students in best pedagogies, teaching excellence, learning models, instructional methods, e-learning quality, emerging technologies, data analytics, grant application, contract management, inquiry philosophy, program evaluation, research, and statistics. He currently consults for higher education on teaching excellence, measuring academic quality, emerging education technologies, future university, competency-based curriculum, innovation, entrepreneurship, transdisciplinary collaboration, and upcoming generations of learners.
|
EXPERIENTIAL, OUTDOOR & ADVENTURE (<300 words)
Dr. Simon Priest was a tenured Full Professor in Experiential Education and Executive Director emeritus of the Corporate Adventure Training Institute at Brock University in Ontario. At that time, he was designated as the world's leading authority on outdoor leadership and the efficacy of corporate experiential training and development programs. He received 15 scholarly awards for excellence in teaching, research, ethics, and service. He was invited as a visiting academic or guest professor at more than 25 universities around the world.
He has co-authored several best selling textbooks (some translated into German, Japanese, and simplified Mandarin and Cantonese) including these gold standards for many experiential teamwork and leadership development providers:
- EFFECTIVE LEADERSHIP in Adventure Programming (with Mike Gass),
- ADVENTURE PROGRAMMING (with John Miles),
- 101 of the best CORPORATE TEAM-BUILDING ACTIVITIES (with Karl Rhonke),
- 100 of the best VIRTUAL TEAM-BUILDING EVENTS,
- 99 of the best EXPERIENTIAL CORPORATE GAMES (with Sam Sikes & Faith Evans),
- Essential Elements of FACILITATION (with Mike Gass & Lee Gillis),
- ELECTRONIC FACILITATION, and
- Essential Elements of Experiential PROGRAMMING (with Jude Hirsch).
As a transdisciplinary professor, he has taught courses in eco-tourism, adventure programming, experiential facilitation, outdoor leadership, environmental sustainability, organization, administration, program development, event planning, natural resources, wilderness management, program evaluation, research methods, inferential statistics, and creative outdoor photography. In addition to being a professor, he has served as a university dean, provost, vice-chancellor, and senior vice president. Today, he consults for corporations and higher education, enjoys outdoor pursuits in his spare time, and travels the world for fun. |
MANAGEMENT, LEADERSHIP & TEAMWORK (<200 words)
Dr. Simon Priest has trained thousands of facilitators in over 50 nations and delivered team-building and leadership development programs to companies in almost 100 countries. While President & CEO of virtualteamworks.com, he hosted three Technology Think Tanks, designed novel virtual team-building events, developed electronic facilitation techniques, created online diagnostic instruments, and authored unique virtual team-building groupware. Partnering with John Chen and GeoCaching.com, he co-created GeoTeaming.com and its many variations of the GPS-based scavenger hunt.
He has worked with hundreds of corporations across a wide variety of sectors. Most notable among these was a decade with Canadian Tire, where he launched a competency-based corporate university for managers in their Financial Services division, trained all employees in values-based and/or facilitative leadership, pioneered video team-building, and conducted executive expeditions. As a business professor, he has taught online college courses in leadership, teamwork, human resource management, organizational behavior, and entrepreneurship. He currently consults for corporations in facilitative leadership, conflict resolution, and transformational change. |
|
|